You are using an insecure version of your web browser. Please update your browser!
Using an outdated browser makes your computer unsafe. For a safer, faster, more enjoyable user experience, please update your browser today or try a newer browser.
In search of a new and fresh tone for my guitar, which I do every 5 years or so, I landed on the Kraken series from Victory. To try the tone I decided to purchase a second hand Victory V4 Kraken preamp pedal. This was a very good start to see if the more modern would fit my playing
V4 Kraken Preamp pedal
This pedal had to be connected to the return of my amp head. And what a nice and great sound this produced. The only downside was that it did not have a clean channel. So, I sold this for the price I bought it for and decided to order the VX-100 Super Kraken, including a clean channel. And much more.
Victory’s VX100 The Super Kraken is evolved from the award winning Compact Series VX The Kraken, developed with Rabea Massaad. This is a very nice amp, however, also not with a clean channel.
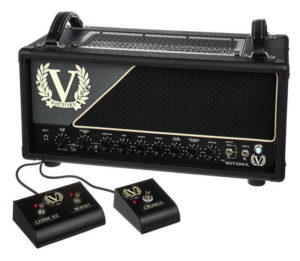
Like Victory states it: “The Kraken has morphed into an even more powerful beast via 100 massive watts of 6L6 power. You still get the Brit-inspired Gain I channel. You still get the colossal smack of Gain II’s US grind… but now there’s a whole new footswitchable clean mode, plus a footswitchable Preamp Focus function to add a little juice and cut to any and all modes. There’s also a preset Bass Focus option in the power section, footswitchable FX loop, assignable/ footswitchable dual master volumes… plus a useful 30-watt low-power mode for when you don’t need to blow the roof off. And, of course, MIDI switching capability.”
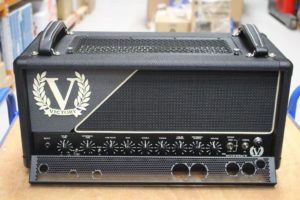
Vx100
So, here are my criteria for an amp head: the size should not be too big or too heavy. Operating it should be easy. It needs a clean channel and a distorted channel and preferably reverb. Midi switching is essential. And the sound should be modern. So the EVH 5150 III 50 watt stealth or the VX-100 were the candidates. The EVH was difficult to obtain in January 2021 and I was able to obtain a Super Kraken with pre Brexit pricing.
The flexibility of the Super Kraken is Mega. Also terms of Tone. Victory’s Chief Designer Martin Kidd posted in the Victory Amp Owners club on Facebook the following explanation (11 May 2021):
“Hi all out there in Victory Land. I just thought I would write a quick post re the Preamp Focus on the VX100, as people have been asking me how it works and whether it’s a copy of a TS9 circuit etc.
It’s a high voltage MOSFET circuit that behaves much like and extra valve stage at the amp’s input. There’s a lot of bass and treble rolled off in this circuit, giving very similar results to those achieved when using your favourite green overdrive pedal; however, the resulting sound is a combination of the MOSFET circuit pushing the preamp in the VX100, as opposed to the sound being generated entirely in the MOSFET circuit itself.
The VX100 has a low power mode, as many of you know, and this was added for those who like to push the amp’s output stage harder and who like a more compressed sound that might suit other styles of rock and metal other than the “djent” style of playing, with a very sharp attack and tight low end. The Preamp Focus, depending on various things like your pickup output, technique and string gauges etc., can push the first valve stage harder when using the Low Power mode; sometimes giving a slightly softer feel. If you need the faster attack and headroom of the High Power mode; stick with High Power mode and use your master volume controls for lower volumes. If you want the added compression or your pickups have a more modest output, perhaps; Low Power may well work for you, in conjunction with the Preamp Focus. These modes, however (Preamp Focus and Low Power), are features that enable the end user to elicit a different tone and feel; rather than purely reduced volume. I hope this clarifies things and answers any questions you might have.”
Now, I am still discovering the VX100, but so far, after a couple of months, it’s a very versatile and reliable amp.
Categories: Guitar Gear|Comments Off on Victory VX-100 Super Kraken
While building a new pedalboard I was in search of the first type of pedal that I always stick on my board: a decent reverb pedal. For years I have been using the Electro Harmonix Holy Grail Nano. This one does the trick every time. But I wanted something different.
Now, the obvious choice was a Boss RV-6. The newest Boss digital reverb. But I wasn’t convinced that this would be my type of reverb. I always want something original as a reverb pedal.
MXR M-300
After seeing one of the nicest commercials I was attracted to the more expensive m-300 reverb pedal by MXR. The carbon copy was a good choice as well.
The m300 delivers six distinct exquisitely crafted reverb styles, a hi-fi analog dry path with a massive 20 volts of headroom, and numerous other features to tailor your reverb sound.
The PLATE setting provides a shimmering smooth wash of space that’s a go-to choice from the studio recording world. SPRING sets a new standard for truly authentic sounding reverb without coiled metal—a perfect recreation of the classic amp-based effect, with the Tone control taking you from dark vintage amp spring, through classic jangle, to bright surfy splatter. EPIC is a unique combination of multiple interwoven analog-tone delay lines and complex modulation—perfect for solos from that more shaded part of the lunar landscape. MOD throws down a plate-flavored spaciousness with richly organic modulation in the feedback path. The ROOM style adds subtle body and projection to your guitar tone at shorter decay times while longer decay times yield rich organic space that doesn’t wash out. PAD closes out the line-up with a unique combination of sub-octave + octave-up with echoes + “shimmer” + synth/organ modulation + reverb.
My overall view on this pedal is that the tone can easily be used in a subtle manner, or with a huge dose. For example, I use the pedal with a Victory VX-100 super kraken. Even on the rhythm channel I have some plate reverb mixed in. You can dose the amount pretty well and especially in a full band setting it doesn’t strike me as too much that quickly.
My overall conclusion, and also based on reviews, was that the m300 sounds slightly more organic than the boss. The only major downside is that the pedal requires a massive 240 mA. This means I had to upgrade my power supply on my board. Oh well, this enabled me to get an isolated power supply for a better sound quality.
Here is the link to the manual. If you are looking for a good reverb pedal in a small no nonsense format, which not only looks great but provides the best reverb sounds I have heard, don’t look further.
Ever since it came out, I have been a fan of the Boss TU-3 tuner pedal. It is housed in a sturdy boss-familiar compact pedal housing and it has nice visible LED lights. It’s super useful.
However, there were two things a little off in my opinion: the color…. being white with orange letters, and the fact that it did not have a buffer. The first pedal in the chain, mostly a tuner pedal, should have a buffer.
Many other manufacturers did figure that out. And also the color: Korg has launched it’s pitch-black series years ago.
Until recently: Boss came out with the TU-3W. W stands for Waza Craft. In Japan, “Waza” is the term for art and technique, and these special edition pedals proudly carry the Waza symbol to represent the pinnacle of Boss’ design and craftsmanship.
What does Waza mean according to Boss? Since the beginning, the engineers at BOSS have been committed to achieving the finest guitar tones using any technology necessary, from old-school analog circuits to high-tech DSP. Continuing this enthusiastic spirit, we are pleased to introduce the Waza Craft series. In Japan, “Waza” is the term for art and technique, and these special edition pedals proudly carry the Waza symbol to represent the pinnacle of BOSS design and craftsmanship. Being made in Japan, the Waza Craft series brings you exceptional tone and touch response through carefully selected analog components, refined circuitry, and meticulous attention to detail.
Why is this pedal more expensive and better? The colours fit better with my pedalboard. Secondly, the circuitry is the best you can get. This means that at the start of your signal chain, no noise issues are introduced. This looks like a small thing, but the signal is only extrapolated more along the chain, and amplified through your amp. Imagine.
And lastly, the pedal is switchable: true bypass or buffered. oh, and it can also provided power to secondary pedals with a 9 volt out. Although I would go for an isolated power supply.
The display can be set in normal mode and bright mode. I prefer the latter. Some people complain about the bright setting but then again it can also be used outdoors very well. The blue color is nice and gives a very high quality look to it, combined with the black exterior of the pedal.
So yes, to me, this is the best tuner you can buy. It is about 60 Euro’s more expensive than the regular TU-3. But it has more advantages.
Many internet gear heads have heard of a guy called Rob Chapman. Consider him a Youtube celeb, he is also in charge of Chapman guitars and is known for many gear reviews for Anderton’s, a music store in the UK.
Rob has been passionate about amps and guitars for ages and has in the past developed an amp at Victory Amplification together with Victory’s chief designer Martin Kidd, called the Silverback. Please find my thought on this amp here.
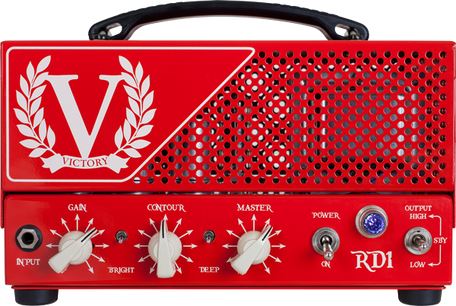
A couple of years ago, in 2017, Rob and Victory created the Victory RD1. RD stands for Red Dwarf, since the amp is very small in size.
Victory RD1 Front
This can be considered an ultra compact amp and is a single-channel head. It is all-valve, based on two EL84’s with fixed-bias power to provide you with 28 watts in full power mode and just 2 watts in low power. The amp is only 263mm wide, which is smaller than an A4 sheet.
The thought from Rob behind this amp were “I wanted something that was affordable, doesn’t compromise on tone and is made in England. It’s a straight-ahead, giggable, no-nonsense valve amp: clean to scream at the turn of a knob.“
The key features of this amp are: Power: 28/2 watts RMS Valves: 3 x 12AX7, 2 x EL84 Size (mm): 263(w) x 170(h) x 195(d) including controls, handle and feet Weight: 6kg / 13.2lbs Extra features: Bright switch Deep switch Contour control Series effects loop with wet/dry mix control High and low power modes Padded carry bag included
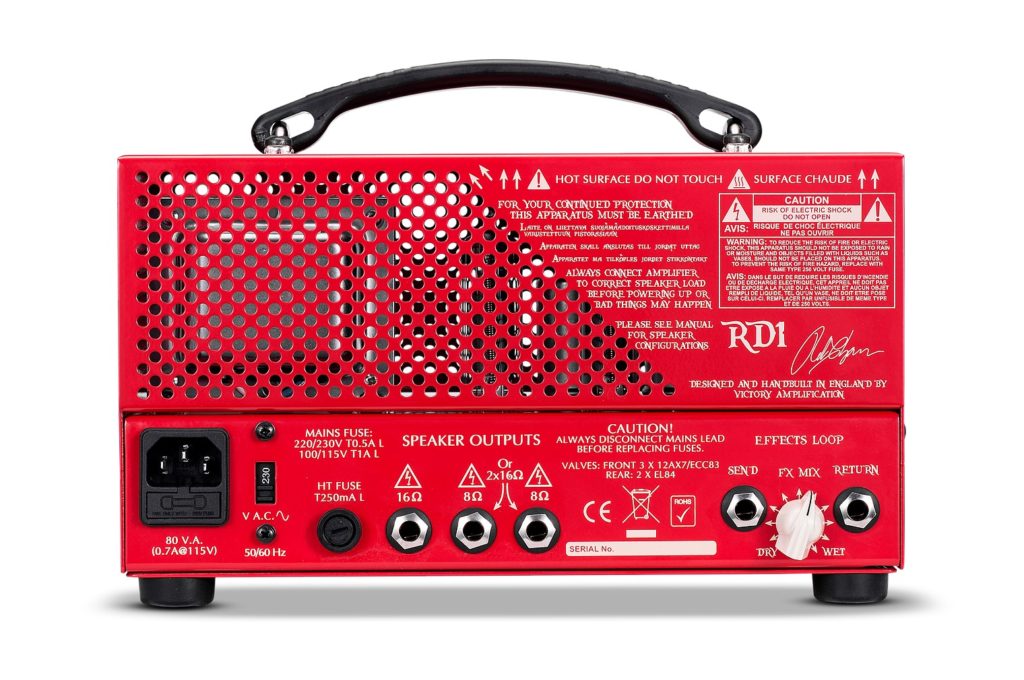
Backside of the RD1
I have bought this amp as a side amp. It’s very versatile and responsive, but it’s also a one trick pony, since it does not do cleans too well. It is however a very nice amp for playing blues, believe it or not. And when combined with an Electro Harmonix Holy Grail Nano Reverb, it sounds just awesome. Also, you can use it for other, and heavier purposes, such as metal, when you would combine this with a tube screamer pedal in the front, such as the Ibanez TS808, this is undoubtably the best overdrive pedal ever made.
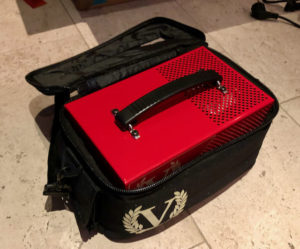
The best part is: the amp is so incredibly portable that once you start working with this amp on the road, you do not want to go back. That is, if the amp fits your needs. The amp comes with a bag around it, to just carry it to a gig.
RD1 in the bag
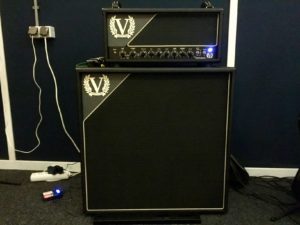
Here is a picture of my RD1 on top of the V212S 2×12 Victory cabinet. It just looks awesome and works really well. This ia absolutely a gigable setup. I am also combining it with a 1×12″ Barefaced Reformed cab, for an even more compact setup. It is load enough for a 2 guitar rock band, live and in the rehearsal room. Power wise, this is all you would need. On bigger stages the cab will get miked up anyway.
Here are a couple of reviews of the amp. I highly recommend this amp, although initially I had a love/hate relationship with in. I even sold it once and thoroughly regretted it. It’s now here to stay.
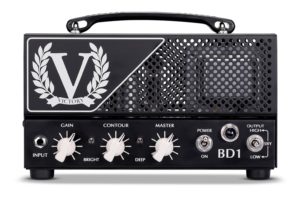
There is also a non-signature version of the amp, called the BD1. It’s essentially the same amp, in black, with no Chapman Signature colours and fonts on it. I like the red one better. Rob’s philosophy behind the color was that it would be easier to spot. Also, after a gig so that someone just does not walk out the door stealing your small amp. You can spot it then. Well, dunno, but I just like the red. There is even a red 1×12 or 2×12 cab available from Victory
Victory BD1
Anyway, I like I said: highly recommendable. It might seem tonally a bit dark to some people. It is however very versatile and you can alter the character of the amp using the Contour knob or the Bright switch or the Deep switch. Contour increases bass and decreases mids when turned clockwise (and vice versa), which takes you from mid-scooped metal tones to classic rock-approved vocal midrange. The Deep switch increases low frequency response in the power amp and the bright switch makes it brighter.
Here is an extensive demo by Rob Chapman
Here’s the official video
And here is Lee Anderton playing some awesome blues
Since 1998 I have been a long standing user of the Marshall JMP-1 Pre amp. It has been my go to amp for many years. I have had many versions of it, some better, some worse. I have tweaked the amp in some cases. And more recently, I have managed to get a fully unused on. Therefore, I decided to create a Facebook page for the Marshall JMP-1
In search of the best tone for the Silverback I have moved over to Boss pedals recently. The Waza Craft series again have bumped up Boss to the higher regions of pedal quality. After moving away from Mooer pedals (which were quite okay and are great value for money), I wanted something classic and solid.
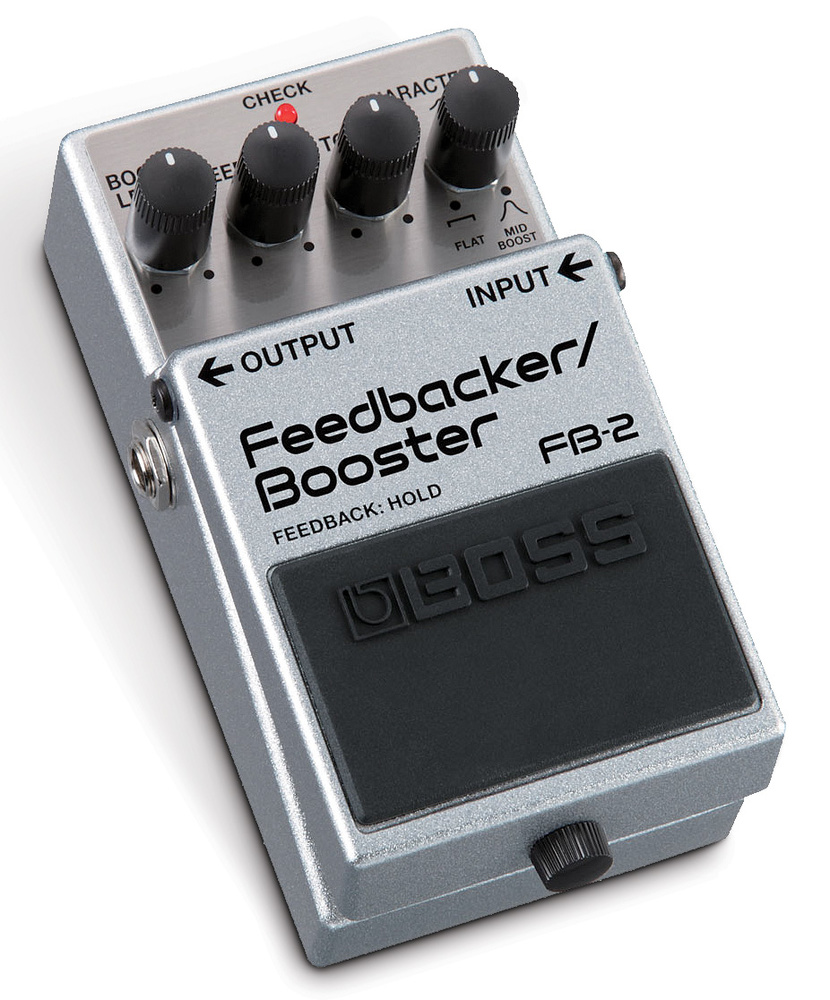
And thus, I needed to go and seek. I needed a Boost pedal for the FX-loop. At the time of writing this article (May 2017), Boss unfortunately did not produce a boost pedal anymore. I scavenged their website for a boost pedal, but was unable to find it. Sure enough there are people who have tried the Boss BD-1 Blues Driver as a boost pedal. Not really what I wanted. I needed a dedicated boost pedal. The Mooer pedal was quite okay, so I liked “boost”. Hence, I decided to go and find the discontinued pedal called the Boss FB-2 Feedbacker/Booster.
Boss FB-2
The first thing that struck me about this pedal was the color: silver-flaked. Does it matter? Nope. just a detail. The pedal is an unusual one, which incorporates some rather clever technology allowing guitar players to create feedback-powered sustain and at relatively low levels. (So, you can get the on-stage-haning-your-guitar-in-front-of-your-speaker-cab-sustain, without instantly annoying your neighbours. Now, this is a nice-to-have gimmick: the main purpose of this pedal is to serve as a gain booster. This feature has variable tone and character, so that valve amps can be pushed into natural overdrive without losing any of the original tone.
The pedal has 4 knobs for:
the boost level,
the feedback level
tone control and
tone character.
Using this pedal for the first time during a solo with my band, it struck me that I was unaware of the pedal being used, other than my volume being louder. I use the boost pedal in the FX-loop of the Silverback. And this was a good sign. I used the Marshall Bluesbreaker 2 as an Fx-Loop boost as well as the Mooer Pure Boost as a (clean) booster. The Mooer was okay and did the trick quite well. The BB2 pedal however is, as a boost in the FX-loop, a bit too glassy for me. It does the trick better in front of the amp. However, that was not why I wanted the boost pedal.
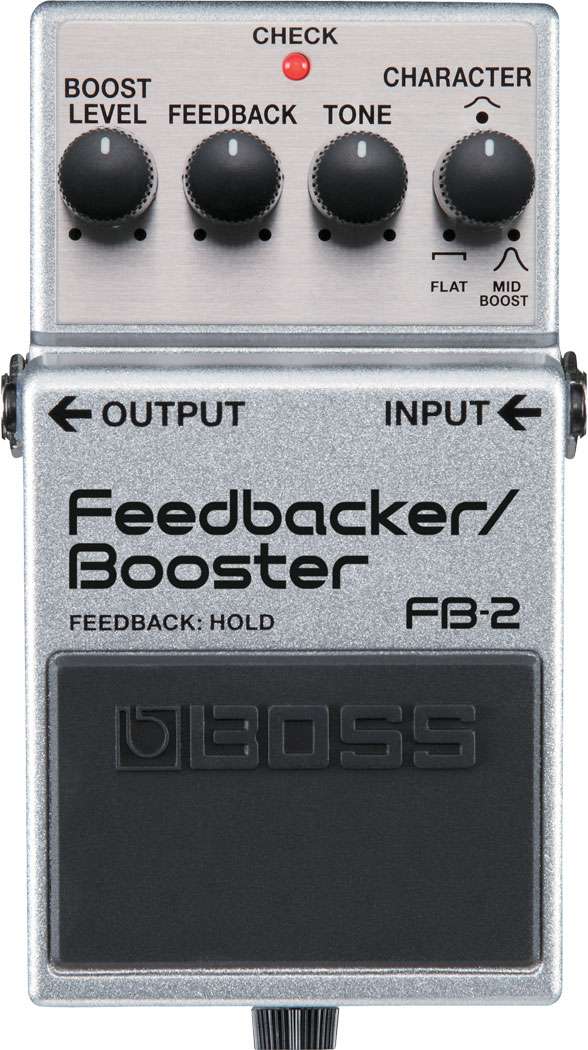
The tone control can be considered to be fairly neutral around its centre position and brightens the sound when going clockwise or rounding off the highs counter-clockwise.
FB-2 from the top
The character control is basically a mid-frequency boost that sounds very effective when pushing an amp into overdrive. There’s nothing too mysterious so far, then, although you can set up a boost level for solos, then back off the guitar volume control to get a clean sound that’s pretty much what you’d expect to hear with the guitar turned fully up and the pedal bypassed.
The pedal works as expected until you press and hold the pedal, at which point the feedback effect is faded in over a period of a second or two, and the guitar tonality changes because of the filtering and extra gain that’s been added. If the amp level is set too low, the sustained note eventually dies away and you’re just left with boosted pickup hum and amp noise, but it’s surprising how quietly you can play and still get the effect to work. When you release the pedal, the transition back to the clean boost tone is also smooth.
I find the FB-2 to be a great pedal, allowing me to play my solo’s at a higher volume level and using the right tonal character for my solos. And if this feels well, I play well. The sound of the pedal can be defined as being a “musical” sound. I have heard boost pedals that were noticeable and were somewhat harsh. The FB-2 is more musical in stead. Even though I spent very little time tweaking the pedal. Band rehearsal started and I guess the band has become rather exhausted when it comes to being patient about my gear-chaging-time. Anyway, the quality is great and the FB-2 is a low-noise gain booster with tonal adjustment alone. For more specifications, check out the FB-2’s owner’s manual here.
Here’s a review by ProGuitarShop.com
And here is a review by Sweetwater
Unfortunately the reviews do not cover the FB-2 in the FX-loop. If you find a youtube video that discusses the FX-loop option, please drop me a note, so I can add this to this review.
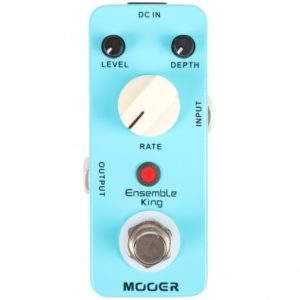
Some time ago I decided to trade in my Mooer Ensemble King Chorus pedal for a Boss CE-2W Waza chorus pedal.
The reason for this was that I felt that during playing, the Mooer chorus generated some ‘tone suck’. The intensity of the tone went down when I kicked in the pedal. Just slightly, put it did.
Mooer Ensemble King
The sound of the mooer chorus was quick okay, and very subtile. I was however looking for something better.
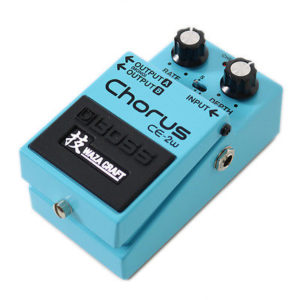
Hence, the Boss CE-2W Waza chorus. This pedal is way more expensive. The Mooer goes for approximately EUR 60,- and the Boss does EUR 209,-. One would say that it will have to be a better pedal.
My first impression of the CE-2W was that the chorus sound is fare more distinctive and way more classic. The Mooer was somewhat subtile and in some cases not easy to distinct. The CE-2W is in your face and is absolutely a Chorus sound.
Boss CE-2W
The Boss CE-2w was built in the Waza Craft series and basically contains the chorus and vibrato effects of the
CE-1 chorus pedal
CE-2 chorus pedal
CE-1 vibrato pedal
It has controls for rate and depth, 3 modes (standard, CE-1 chorus, CE-1 vibrato) and contains analog compontents with bucket brigade device (BBD). It has the known Boss dimensions of (whd): 73 x 59 x 129 mm and weighs 450 g (incl. battery).
The Boss CE-2 Chorus and its big brother predecessor the CE-1 (along with the same effect built into the Roland Jazz Chorus amp) defined the sound of chorus during the late Seventies and Eighties. So basically, you have 3 pedals in one. The CE-1 chorus pedal option (which is switchable with the small mini three-way toggle switch for selecting the CE-2, CE-1 chorus or CE-1 vibrato modes), sounds best to my ears. It has the chorus sound with sufficient ‘bottom’, that many pedals lack.
The Rate and Depth control knobs are identical to that of the original Boss CE-2 chorus. Compared to this original pedal an extra output is provided for stereo chorus-only (output A)/direct-only (output B) effects.
Only one issue: when I kick in the pedal, it sounds louder than my normal signal chain. I need to figure out how I can deal with this. I have a controllable FX-loop on my Silverback, so perhaps that can help me. This volume jump is especially noticeable in the CE-1 mode. I have read a couple of forum posts here and there. People mention that this was the case on the old CE-2 back in the day. So I need to see if this trim pot (in the original CE-2) might do the trick?
“The trimpot is used to set the bias for the MN3007 delay circuit. Due to component tolerances, the manufacturer needs to have some way to adjust the exact resistance to get the delay circuit to work “just so”. So the trimpot will inevitably be set slightly differently in each pedal. It’s not a question of taste or build year (as in “the early ones had the trimpot set like this, and the later ones like this”) – it’s a function of the tolerances of the components in that specific pedal. This trimmer should only be adjusted with an oscilloscope, using the calibration procedure set out in the service notes.”.
So I guess not…
Well, apart from the volume issue, which I think I am able to correct either by playing softer or by using my FX loop knob, it’s an awesome pedal.
Which guitarist doesn’t know that feeling? The quest for the ultimate guitar tone. Pedals, guitars, pickups, cables, amps and cabinets. They are all revisited and re-evaluated in order to get the best possible tone. And once your budget grows, the great grows with it. In 2015 I wrote a post on my go-to preamp, the Marshall JMP-1. It was my trustworthy amp for many years. I think around 18 or 19 years. I used this amp in combination with the Marshall 9200 power amp and the Marshall JFX-1 effects processor.
Now, don’t get me wrong: this was and still is an amazing setup. But after all these years I wanted something different. Something lighter and more portable. Keep in mind that the combination of these components, and with the tuner, had a weight of approximately 40 KG. And I tell you: that’s a back breaker.
Marshall Stack
So, I wanted something different. But what? Less 80’s sounding, less Iron Maiden sounding. I looked at many types of Marshall amps, and Hughes & Kettner amps, but again wanted something more personalised – something more “me”, like the Marshall stack was/is me. For around 2 years now I have been following Rob Chapman on YouTube and his video’s for Anderton’s music co. Rob struck me as a driven and friendly person. He had been working together with Martin Kidd from Victory Amplification on a signature amp head called the Silverback. Robert Chapman is an English musician, video demonstrator, and founder and owner of Chapman Guitars. Chapman is known for his popular YouTube channel, on which he demonstrates guitar techniques and equipment at Anderton’s Music Store. He is the lead singer and rhythm guitarist of Dorje. Chapman was born in 1975 and lives in Brighton, England.
Victory Amplifiers are designed and (mostly hand) built in England. Victory Amplification aim is simple: to create amplifiers that inspire you ever onwards in your playing and never let you down. Martin Kidd is the head designer of Victory Amplification, and he is well known in British amplification circles, having designed & built some of the best amps in the world over the past 20 years He heads up a modern-boutique approach to design and specification. Only meticulously hand-wired tag boards are used where Victory Amplification feel that method offers the biggest tonal benefits, alongside printed circuit boards where they make most sense. Victory Amplification never compromise on components, from caps and resistors, pots and switches, right through to our custom designed transformers.
Victory Amplification
The Silverback has been a project for Rob Chapman. He designed the amp along with Martin Kidd and by design I mean that Rob voiced his wishes and preferences and Martin built the amp and gave it its exterior look. Here’s a cool video on the start of the project Rob obviously didn’t want to disclose the Amp builders name yet. His thoughts on the design were quite different too back then. (“Give it a wooden look”).
The Silverback became the amp as it is now. It became a two channels amp which has clean, crunch and crushing overdrive tones. The amp delivers “the ultimate blend of sounds and features from Rob’s favourite amplifiers to date“, according to the website. The amp has two special features: “Rob has also come up with an ingenious removable magnetic ‘Knobguard’ that keeps your settings safe when the amp is on stage, and also offers extra protection during transportation. There’s also a flip-up top grille to enable quick access for valve changes.The Silverback delivers all the power, reliability and tonal flexibility for heavy rock and metal players, not least Chappers himself! ”
You can see the amp develop over time.
This video gives more info on prototype 2, the smaller form factor of the amp. It resembles the amp I actually purchased at Anderton’s in october 2016. See this picture below.
Silverback
The Silverback is based on the Victory V50 (The Earl) amp but with a number of tweaks and enhancements. The Silverback is all valve, handwired point to point. This is not a cheap amp. It is hand-made by Victory, though. But it’s not cheap. At Thomann it lists for € 2.700,- and gives you the following features:
Format: Two-channel head
Power:50/15 watts RMS
Valves: 4 x 12AX7, 1 x 12AT7, 2 x EL34 (switchable to 6L6)
Pull crunch for clean channel
Gain boost for overdrive channel
Spring reverb
Effects loop with wet/dry mix control
High/low power switch
Selectable output bias for EL34 or 6L6 power valves
‘Magnetic ‘Knobguard’
Flip-up valve access grille
two carry handles
Size (mm): 567(w) x 250(h) x 260(d)
2 foot switches
Silverback
How is the Silverback different from the Earl? (According to Anderton’s website)
Brighter Voicing
Clean/Crunch is footswitchable
Effects Loop with variable Wet/Dry Mix control via rear panel control
Footswitchable Gain Boost is variable via front panel control
‘Trapdoor’ entry to valves for easy replacement/experimenting
Magnetic ‘Knobguard’ to avoid accidentally changing settings after set
Dual leather handles .
The transformers in this amplifier are, as all the transformers in the Victory Amps, custom wound and designed in-house.
I stumbled onto a bargain at Andertons in October 2016: a B-stock Silverback, which had some minor scratches. Not really a concern. Anderton’s informed me that the crunch-pedal was wired incorrectly (on was off and vice-versa). Also not an issue. So, I bought the amp. It shipped perfectly and the crew at Anderton’s did a great job.
The amp is not a high gain amp like one is used to from, for example, Marshall. It has it’s own signature sound, and is very much Victory. The clean is very clean but can be controlled with the gain knob to make it break up. Not a feature I use a lot, just like the crunch feature. If you are into more classic rock (even the Rolling Stones) it can absolutely do the job. You can use the crunch “channel” (its not really a channel) for all kinds of light rock music.
The gain channel is more up my alley. The gain boost is great for solo’s and the gain itself is slightly darker, very distictive. I was used to play very high gain and the normal gain settings (without the boost) taught me that there was more in life than full power gain. The normal gain setting can be more open and can sound more like a guitar in stead of “gain”. With the boost, that level can still be reached. Yes, you can play Metallica with this amp (See YouTube movie here) and I play Iron Maiden with this amp. It does the high gain stuff without any issues.
I also purchased the matching cabinet from Victory, the V412S, to make it look and sound great. The cabinet does have more low end than my Marshall JCM 800 1960 A, so I do have to turn down the bass QC pot and I have, to control the low end, connected an EQ pedal from Mooer to the FX-loop. It works like a charm. I think I have found my new and better signature tone. This amp fits me and my music. I play all kinds of stuff, such as Foo Fighters, Iron Maiden, Bon Jovi, Paramore, Pearl Jam, Audio Slave, 80’s, 90’s and ’00 covers, blues. It does the trick. And I agree with the so called multi-style demo from Anderton’s as shown below. It can produce many different kinds of tone.
The EQ on the amp is a shared EQ, but my experience is that the EQ for the clean channel works perfectly for the gain channel and for the gain boost, which by itself has some more mid and high end. The amp is provided with the following controls:
Clean Channel Gain (with Pull Crunch feature), Channel Select Toggle Switch, Overdrive Channel Gain, Gain Boost Toggle Switch, Gain Boost, Bass, Middle, Treble, Clean Master, Overdrive Master, Reverb.
I have set the EQ pretty much as Rob has demo’d it in his video’s, where indeed he also removes some of the low end. The reverb is okay, and could have been of a better quality since this is a short spring reverb. I like it, but as a mild reverb, not dialed above 08 o’clock. Here is the official video:
The gain and volume combination was slightly new for me but took me about 10 minutes to master. I felt in control of my amp within half an hour. And thrust me, the JMP-1 and JFX-1 took me many years. The 50 watts are loud… very loud. You can even run the amp in combination with the Victory 4×12 cab on 15 watts mode, even in a band situation. You do have to drive it, but it sounds well saturated and driven. The sound is very natural even when using higher gain stages. Here’s a review by Rabea Massaad.
Now, the setup wasn’t cheap. the V412 costed me 770,- euro on a special sale at Anderton’s, but normally costs 829,- GBP. It has the following specs:
Format: 4 x 12 extension speaker cabinet
Redwood pine and baltic birch
Power handling: 240 watts
Impedance: 16-ohms
Slightly upwardly slanted speaker
Speakers: 4 x Celestion Vintage 30
Size (mm): 738(w) x 748(h) x 355mm (d)
Hand-made in the UK.
So, the complete setup costed me around 3.000,- with the B-stock and the special sale. It you would tae the normal list prices, it would come down to around 3.700 euro. That’s a lot of money. Is it worth it? My opinion is that it is. I have found great tone. Drop me a note if you have any questions. This is my setup below:
My Silverback
For you as a potential Silverback owner, its good to know that customer service at Victory is the best I have ever seen. They are extremely personal and are very responsive to your questions, remarks or enquiries. I have asked Victory a question on the background of the gain boost feature of the Silverback and was replied by Martin Kidd himself. I wanted to know if the gain boost feature would ba able to be set up to achieve a volume boost level. I was also wondering if there might be an internal pot-meter which might be adjusted. Martin was more than happy to take be through the technical aspects of the amp.
“The gain boost isn’t designed to produce a volume boost, as such, though Rob possibly achieves one by setting the overdrive gain much lower than 1:30 and the gain boost a little higher than 11:00, perhaps. The gain boost only allows more signal from the input stage to the second gain stage so really, as the second stage is already being overdriven, it isn’t able to amplify a signal any further. As we know, things aren’t quite so simple; so setting the overdrive gain a bit lower and the boost level a bit higher than you have them may produce the extra level you’re after but otherwise there isn’t anything in the amp that can be adjusted to give a solo level increase.”
The Victory amps community is also nicely united in the “Victory Amp Owners Club” on Facebook. People there are very positive and are more than happy to share their experiences. Here are some more backgrounds on the Silverback amp, told by Rob Chapman:
And if you want to know more about the background of this amp and would like to know more about the thoughts from its designed and builder, Martin Kidd, do take a look at this video. In This video Chappers & the Captain ask Martin Kidd to take you through the final stage of the long awaited Silverback amp from Victory. “You can see that Martin clearly a master at what he does, without letting his genius run off with his ego!“. This video shows the great (high gain) capacities of the Silverback.
Here’s an early episode of the way towards building and completing the Silverback. Quite obvious Martin Kidd is still working on the amp. The amp is in the back and lies on its back. Quite obviously still undergoing tweaks.
Here are some interesting links to Silverback related pages:
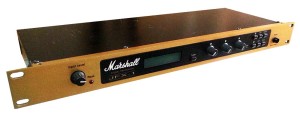
The Marshall JMP-1 rack mounted pre-amp was first introduced my marshall in the year 1992. Is this value driven Marshall JMP-1 the best pre-amp ever? Some people might doubt that, but after 20+ years of playing guitar, I am convinced this is the most versatile pre-amp in the business. And… it’s a simple one.
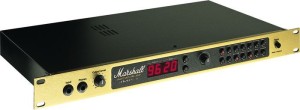
Marshall JMP-1
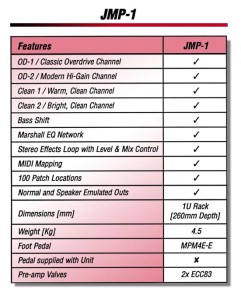
There are many (combined) pre-amps available. but not as great as the JMP-1. The JMP-1 has the ability to store sounds, programmed from the two clean or two overdrive channel selections, in any of its 100 patch locations each of which are MIDI mappable and MIDI selectable. Compatibility with rack effects processors is ensured by the provision of level selection on the programmable effects loop. In addition, built-in speaker emulation gives the facility of linking directly to the PA or recording desk for the most massive direct sounds imaginable.
FEATURES:
OD-1/Classic Overdrive channel – smoldering power will take you from a Super Lead Plexi’s molten gold through to searing modern metal.
OD-2/Modern Hi-Gain channel – tightly focused high gain drive by the truckload. Modern and aggressive, yet fluid and toneful, this stunning channel will give you all the distortion and sustain you’ll ever need.
Clean 1/Warm, Clean channel – for warm, full bodied chords, fat clean lead passages and jazz tones.
Clean 2/Bright, Clean channel – has the glassy edge of a JTM45 and will give all of the bright, jangly tones you could wish for.
jmp1table
Each channel includes the following programmable controls: Volume and Gain (0 to 20), Bass, Middle, Treble and presence (rainging from -6 to +6). A Bass Shift option re-shapes the low end character of each channel, too.
Stereo Effect Loop is 100% programmable from 0 (fully dry) to 12 (full effects) and has level selection (-10dB or +4d) to match your effects processor.
Each channel and parameter selection is made by pushing the relevant key and then adjusted by using the rotary Master Data control. Once you’ve dialed in a sound you want to savem simply press the Store Key twice. Recall is instant either from the front panel, via the optional Marshall 4 way footswitch (MPM4E), or via MIDI.
The JMP-1 has MIDI IN, OUT, and THRU connections plus a mapping facility. You can also select the channel (1-16/Omni) on which MIDI messages are transmitted and received by the JMP-1.
Left and Right Outputs are switchable between -10dB and +4dB.
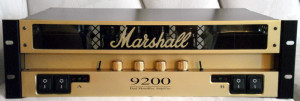
In my opinion, the best way to use this pre-amp is with a Marshall 9200 dual mono block power amp and a Marshall JFX-1.
Marshall JFX-1.jpg
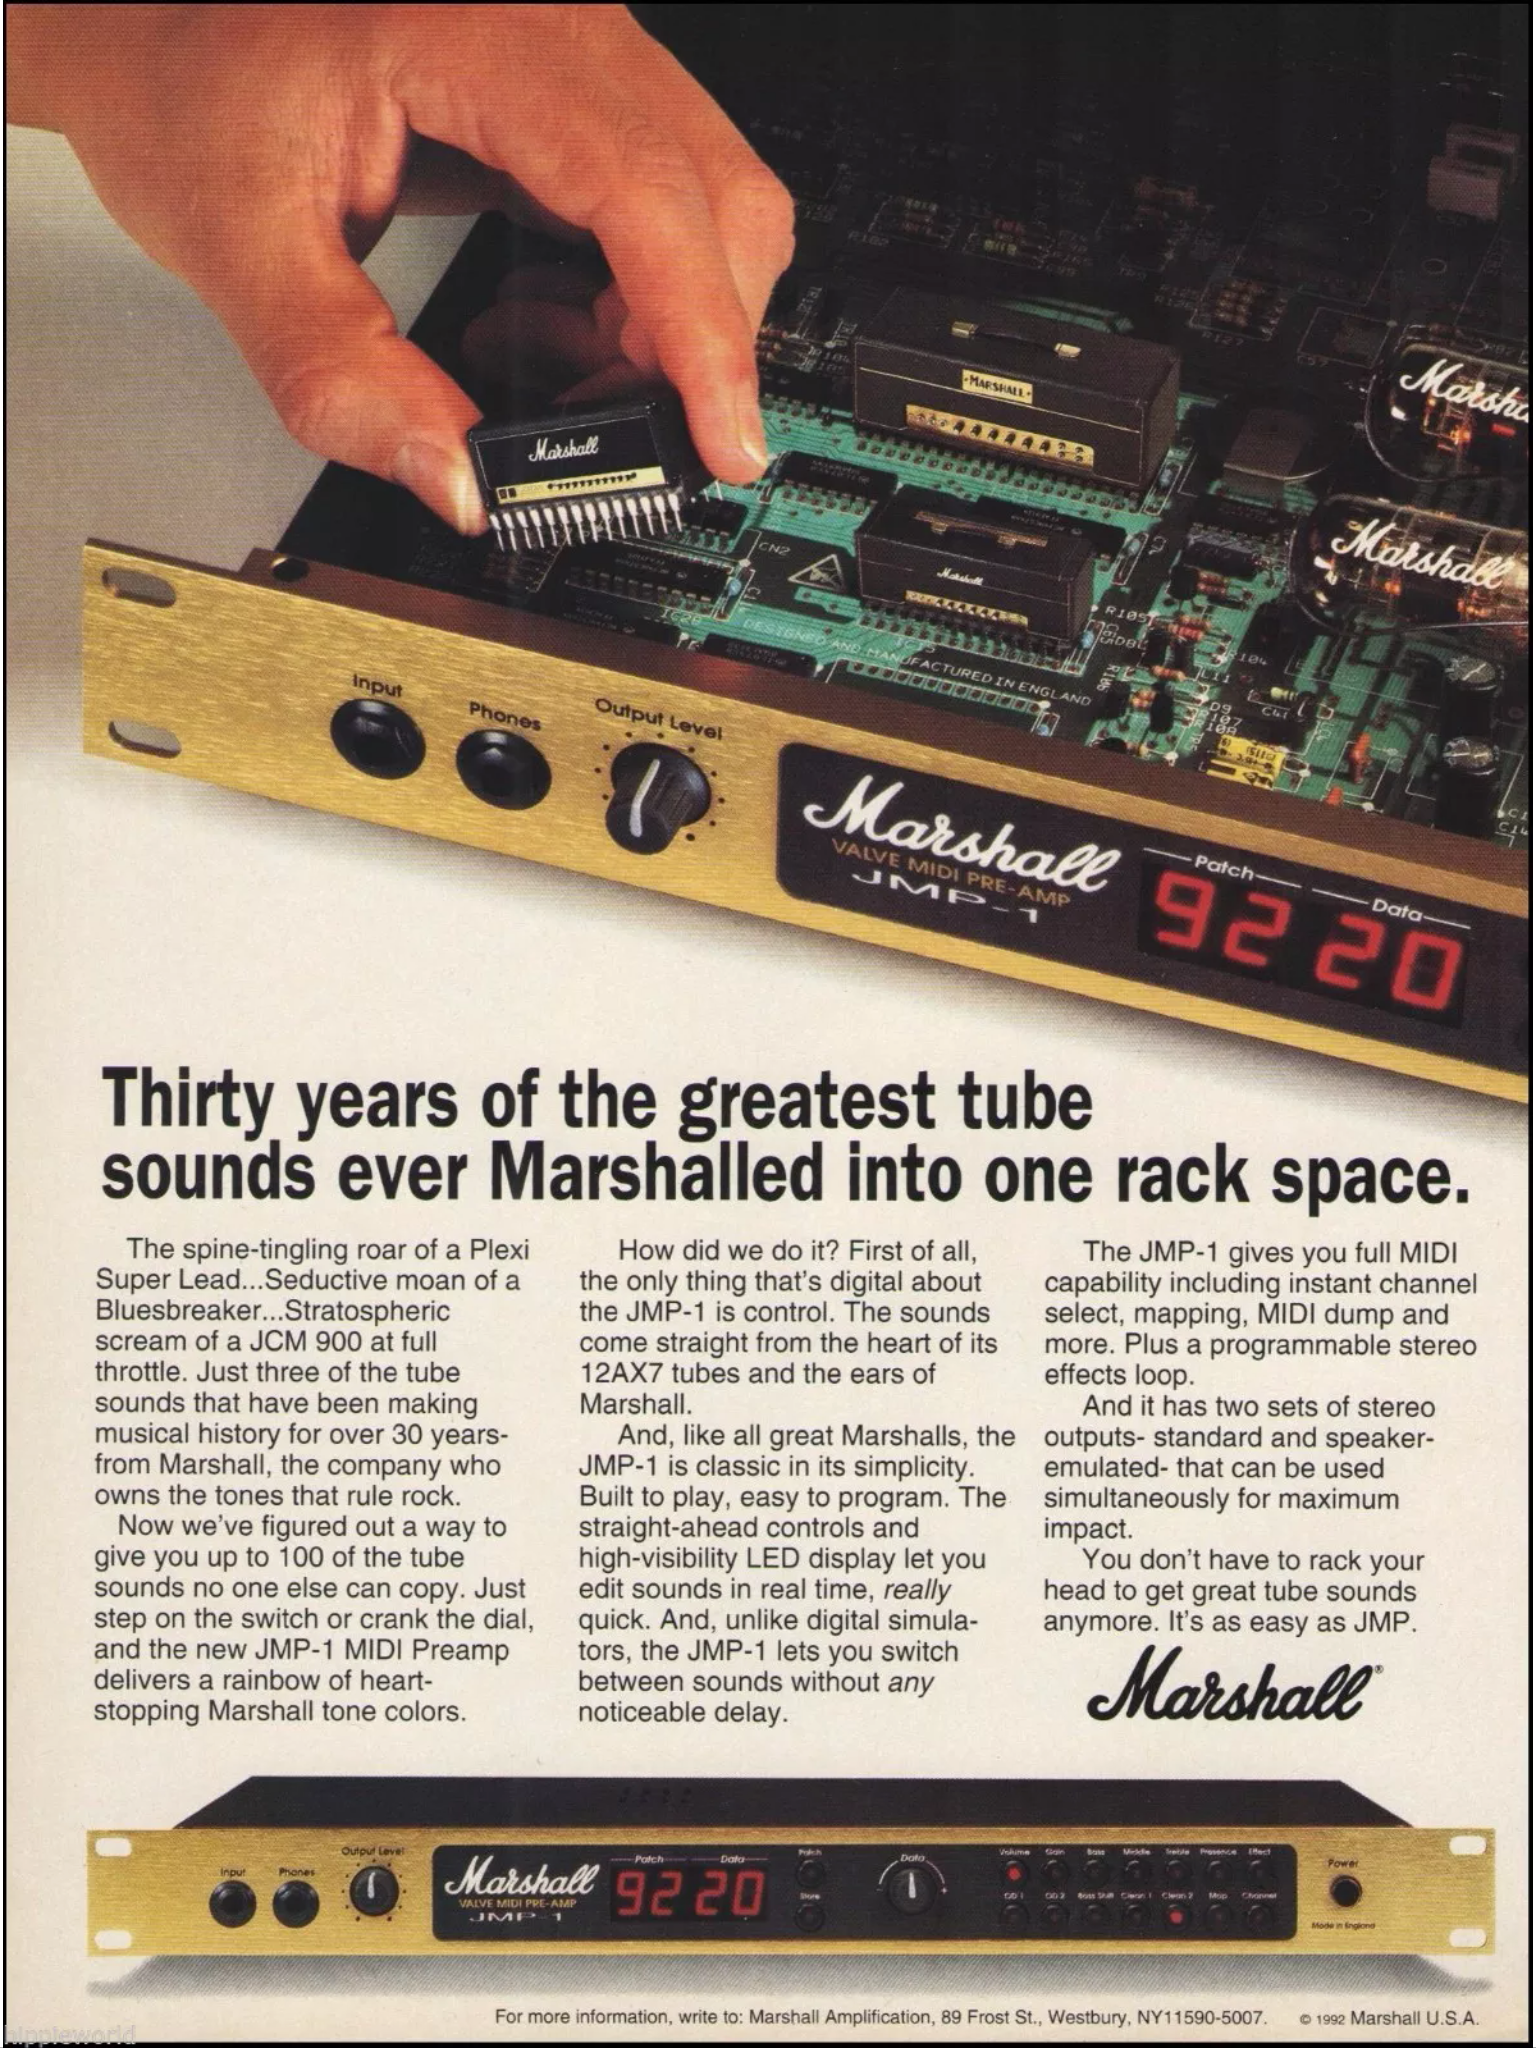
I managed to find the original brochure-poster of the JMP-1. I thought it is awesome.
JMP-1 poster
Marshall 9200
I will do my best to write a review on these two suckers too. They are the favourite setup of Dave Murray of Iron Maiden and of Billy Gibbons of ZZ-Top. Here are some nice reviews on youtube:
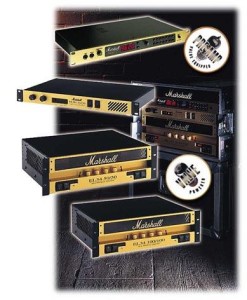
This is a picture of the original catalog
Marshall Rack products
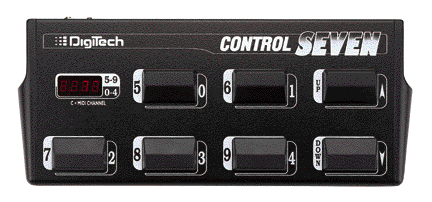
I use the Marshall JMP-1 in combination with the Digitech Control Seven, and not with the limited 4-switch marshall control pedal. The Control Seven gives more control combinations and is a compact and robust pedal.
Digitech Control Seven
So, what is my verdict? This pre-amp gives me any tone I would like to create, from blues, clear rock to rock, heavy metal or death metal. And what is the best option with this pre-amp: you have over 100 channels you can pre-program. Many guitarists use boost-pedals to get their volume up for a solo (for example in a 2 guitarist band). This pre-amp lets you configure as many volume stepped channels as you need. I personally only have 10 presets, or maybe one or 2 more. But you *could* even configure a preset bank (so:1 clean, 1 rhythm, 1 lead, 1 solo, 1 other) per guitar. If you have 10 guitars, it will take you some time though. I have tried a number of amps, including a silver jubilee, but have recently concluded that the JMP-1, JFX-1 and the 9200 is my go-to configuration.
Some interesting resources for all the JMP-1 lovers:
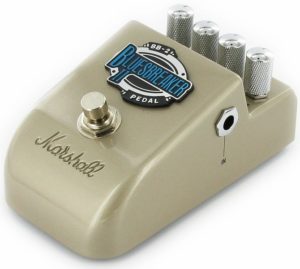
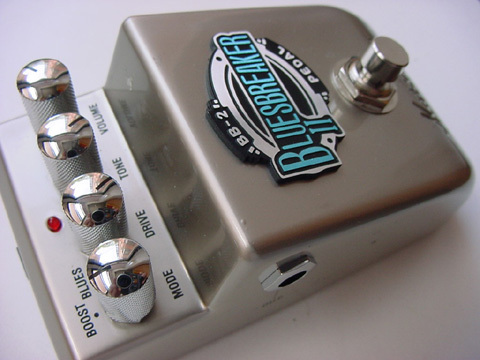
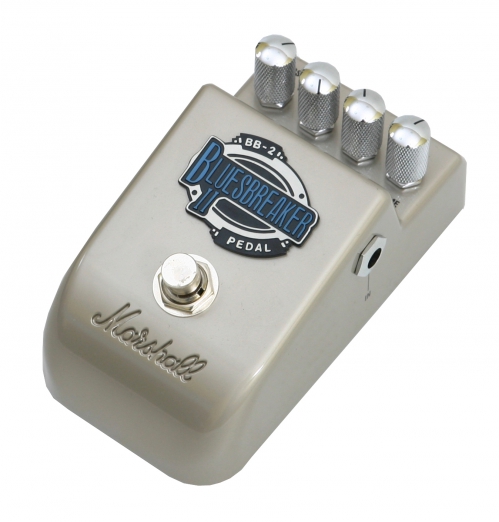
Many has been written and said about vintage guitar gear and pedals. As a guitarist who tries a lot of gear, I am still in the ever lasting quest to find the best tone for my guitar. During this quest for tone I have found one of the better pedals out there which is highly underrated: the Marshall Bluesbreaker 2.
Bluesbreaker 2 pedal
The Marshall pedals have been somewhat underrated during the last couple of years. During the early years of the Marshall pedals, this was exactly the same. When the Bluesbreaker I pedal came out, there wasn’t much interest. This only increased when this series of pedals (say, from around 1992) became “vintage”, somewhere between 2007 en 2017. So, I have concluded that the Bluesbreaker 2 is a different pedal than the original, but is a winner too. In 10 to 15 years people will again seek out for this quite affordable pedal.
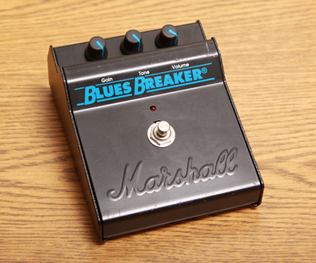
Now, the marshall Bluesbreaker I is the vintage pedal that I am referring to. I have tried this pedal in 2015 and it’s a great pedal. However, for my “line of work” it wasn’t aggressive enough and the volume and tone were somewhat too low for me. The BB2 pedal is a bit more agressive. The original Marshall Bluesbreaker is from the 1990’s and sadly is no longer in production. Prices on eBay are sky high and therefore the BB2 seemed to be a more affordable alternative.
Blues Breaker I pedal
At the date of writing this post, prices vary from 200 to 300 euro on various on line market places. My guess is that the pedal, when it first came out, was not highly expensive. At least, not as expensive as it is now. Given the fact that I still want one, I decided to try the budget option first, being the Blues Breaker 2 (BB-2). It was relatively inexpensive and my thoughts were that Marshall is not completely stupid: the BB-2 would have to be a better pedal than the BB-1. (I am still unsure, so once I buy one, I will post a comparison.). The BB-1 is the choice of various artists such as John Mayer.
But, this post is about the BB-2 pedal. Marshall says the following:
“The Bluesbreaker II takes the philosophy of our original Bluesbreaker pedal one step further by adding two modes, Blues and Boost, effectively making it two pedals in one. Boost mode is designed with the vintage valve amp or ‘tone purist’ player in mind, for when you don’t want to alter the tone of your amp at all, but want to drive the front end harder to push the amp further into natural overdrive.”
“The Boost mode features a clean boost controlled by the pedal’s volume control, which will not affect your original tone. It can also be used for boosting the signal which can sometimes be lost when using long leads (particularly with single coil pick-ups). Blues mode is reminiscent of the tonal and distortion characteristics of our non Master Volume amps, such as the classic Bluesbreaker combo from the 1960s. This mode produces a wonderful natural style overdrive for crunchy chord work and singing single notes for truly inspirational leads, all delivered with the warmth and tonality of those early Marshalls.”
This pedal basically has two functions:
An overdrive for the more vintage blues sound, or
A clean boost for power tube saturation of tube amps.
Marshall BluesBreaker 2
The Boost functionality, switched with “Boost” mode, basically makes the sound of an amp thicker and bolder, which, especially with tube amps, creates a crunch without increasing the volume of the amp. Boost Mode is fine in addition to a lot of drive and amp is easily adjusted by turning the volume only.
The drive mode is controlled with the 3 knobs, drive, tone and volume. and seem to be somewhat progressive. Drive Mode provides a very round drive.
The upsides of this pedal:
Easy to use
Great tone, both in boost or blues mode
Easy going switch. You do not have to kick it in.
Very solid, relatively heavy metal housing. The thing is made to survive a tank rush followed by aircraft bombing and then a nuclear catastrophe.
Clearly indicated led light for on/off
Very versatile. I have used it playing songs from: Bon Jovi, Foo Fighters, Nickelback, Pearl Jam, Paramore, Queens of the Stone Age, Rolling Stones. Gary Moore, Blink 182, AC/DC.
Very reliable. It has not yet failed me.
Inexpensive, so excellent value for money.
The downsides of this pedal
It’s not the BB-1 pedal
Not for metal heads.
Once you buy one, your quest for a great pedal is over… unless you would pursue the BB-1
Marshall Bluesbreaker 2 pedal
Here’s a great review of the BB-2 on YouTube.
Naturally, I would like to let you know something about the Bluesbreaker I pedal as well, so I have incorporated the following Youtube Movie.
Guess you can actually spot the difference. Although these are just youtube movies: it all depends on how it was amped. If you can find a move of the BB-1 vs. the BB-2, drop me a line, so I can post this movie as well.
In case you would own a BB-1 pedal and you would be willing to sell it for a reasonable price, I would love to be the new and well-caring owner. State of the pedal will need to be great, I intend a long lasting relationship with the pedal.
After using the Fender Mustang III V1 for a period of about one year as my main practise amplifier, I decided to go for a full valve amplifier. I wanted something more simple, in stead of a modelling amp made by Fender. Not that the Mustang was a bad amp, because it has may advantages. No, I was also looking for a simple amplifier, with just some overdrive/distortion and a reverb and a clear channel. And next to this, I am a big fan of Marshall Amplifiers. So deep in my heart using a Fender felt a bit strange: The Fender was nice, but my gut feeling told me that Marshall would be more my cup of tea. I have been playing Marshall for many years, using a 1962a cab with Celestion Vintage 30 speakers. This is the feeling I have been playing with for many years.
Do keep in mind that I also considered to look at “The Valve” boutique amps. The 2/50-2 is awesome, but can you really use it at home? Sure, when driving the tubes, the sound is great. But I wanted something that can be used at home as well as in a small venue. My heart told me… Marshall…But something with real tubes..
Marshall SL-5 front
So, after searching for some days, I stumbled on to the Marshall SL-5, the Slash Signature amp. The amp has been designed with and approved by Slash himself,. The 5 Watt SL5 combo is a more accessible way to Slash’s tone, and has been devised primarily for studio or home use. It has two channels, switchable between clean and overdrive. The clean channel takes you from Slash clean to raunchy crunch, and the overdrive channel nails that Slash-style dirty tone.
So… How could I convince myself this amp is worth the money? First of all, I am a great fan of “Chappers & The Captain”….Here’s a great review by Rob Chapman and Lee Anderton, from Anderton’s Music Store:
Basically, the SL-5 is the 5 watt version of the historic AFD-100 from Marshall, introduced by Marshall in 2010.
Now, switching the SL-5 down to 1 Watt means that you can have all that great Slash tone at a volume that won’t wake the neighbours. At the heart of the SL5 are three ECC83 preamp valves and a single EL34 in the power stage, with custom digital reverb. The speaker is one of Slash’s favourites, a 12” Celestion Vintage 30.
Some highlights:
Awesome sound. I like it so much that when I start playing, I get lost in the great tone and forget about time.
It has all the mids that Marshalls have lacked in recent years.
The bottom is tight and adequate.
The gain channel is very responsive in the way you’d expect a tube amp to react, in both playing dynamics and your guitar’s volume control.
Clean channel is very nice; lots of top-end sparkle. You have to work it a little bit.
Reverb is nice.
The amp is quiet, though it has normal hiss when gain and volume is high and you’re not playing.
More features and versatility, better build, higher gain than Class 5.
It’s the smaller version of the Marshall AFD-100
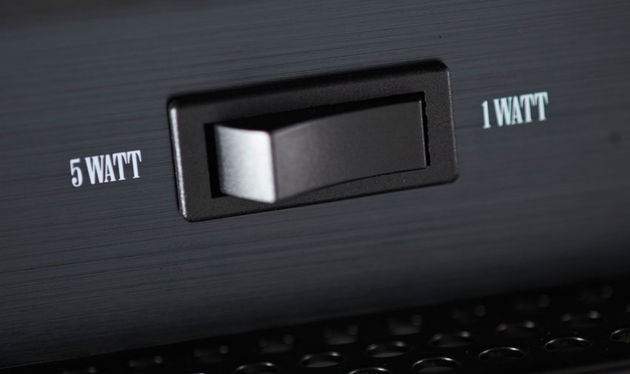
High and low sensitivity input. I typically only use the high low input (=1 =input for low input guitars and boosts the volume a bit).
5 watt to 1 watt attenuator switch. You can really drive the tubes the right way.
SL-5 attenuation switch
Downsides:
It lacks FX loop, but I can get over this.
It lacks independent channel EQ. This would have been nice. However, it keeps the amp simple. This was one of my wishes.
It’s heavy – 25,5 KG
it’s slightly bigger than a small practise amp
When playing this amp it is amazing how much of the Slash sound you can actually recognize. The SL5 is like a bonsai Marshall – small but perfectly formed. Indeed the two switchable channels are rather different. The clean channel has sufficient headroom and gives a very warm tone.
According to Guitar & Bass“The overdrive channel is voiced with definitive Marshall bite, and even with the gain down low the sound is never entirely clean. Turn the gain up a couple of notches and the SL5 bursts into life. From here things move progressively from heavy rock to blistering gain, and the middle control exerts a strong influence on the character of the tone.”
Marshall SL-5
Well, and as always, It’s good to hear the demo from Marshall itself. Here’s the demo by Chris George.
Recently I have recorded an album called Diversity Cafe in my “Lost Highway Studio” along with Wouter Peters from the band Deafening, from the Netherlands. Wouter is the “main guy” on this album, which was his idea. I have engineered and produced the album. The camera-work in the clips was done by Rene Kuipers
Here are two clips from the album.
I can hear your heartbeat (Cover from Chris Rea)
Vocals: Wouter Peters & Evelien Hoffmann
Guitar: Hans Chialastri
The One That Got Away (Cover from Katie Perry)
Vocals: Wouter Peters
Piano: Jorgen Boots
Guitar: Me
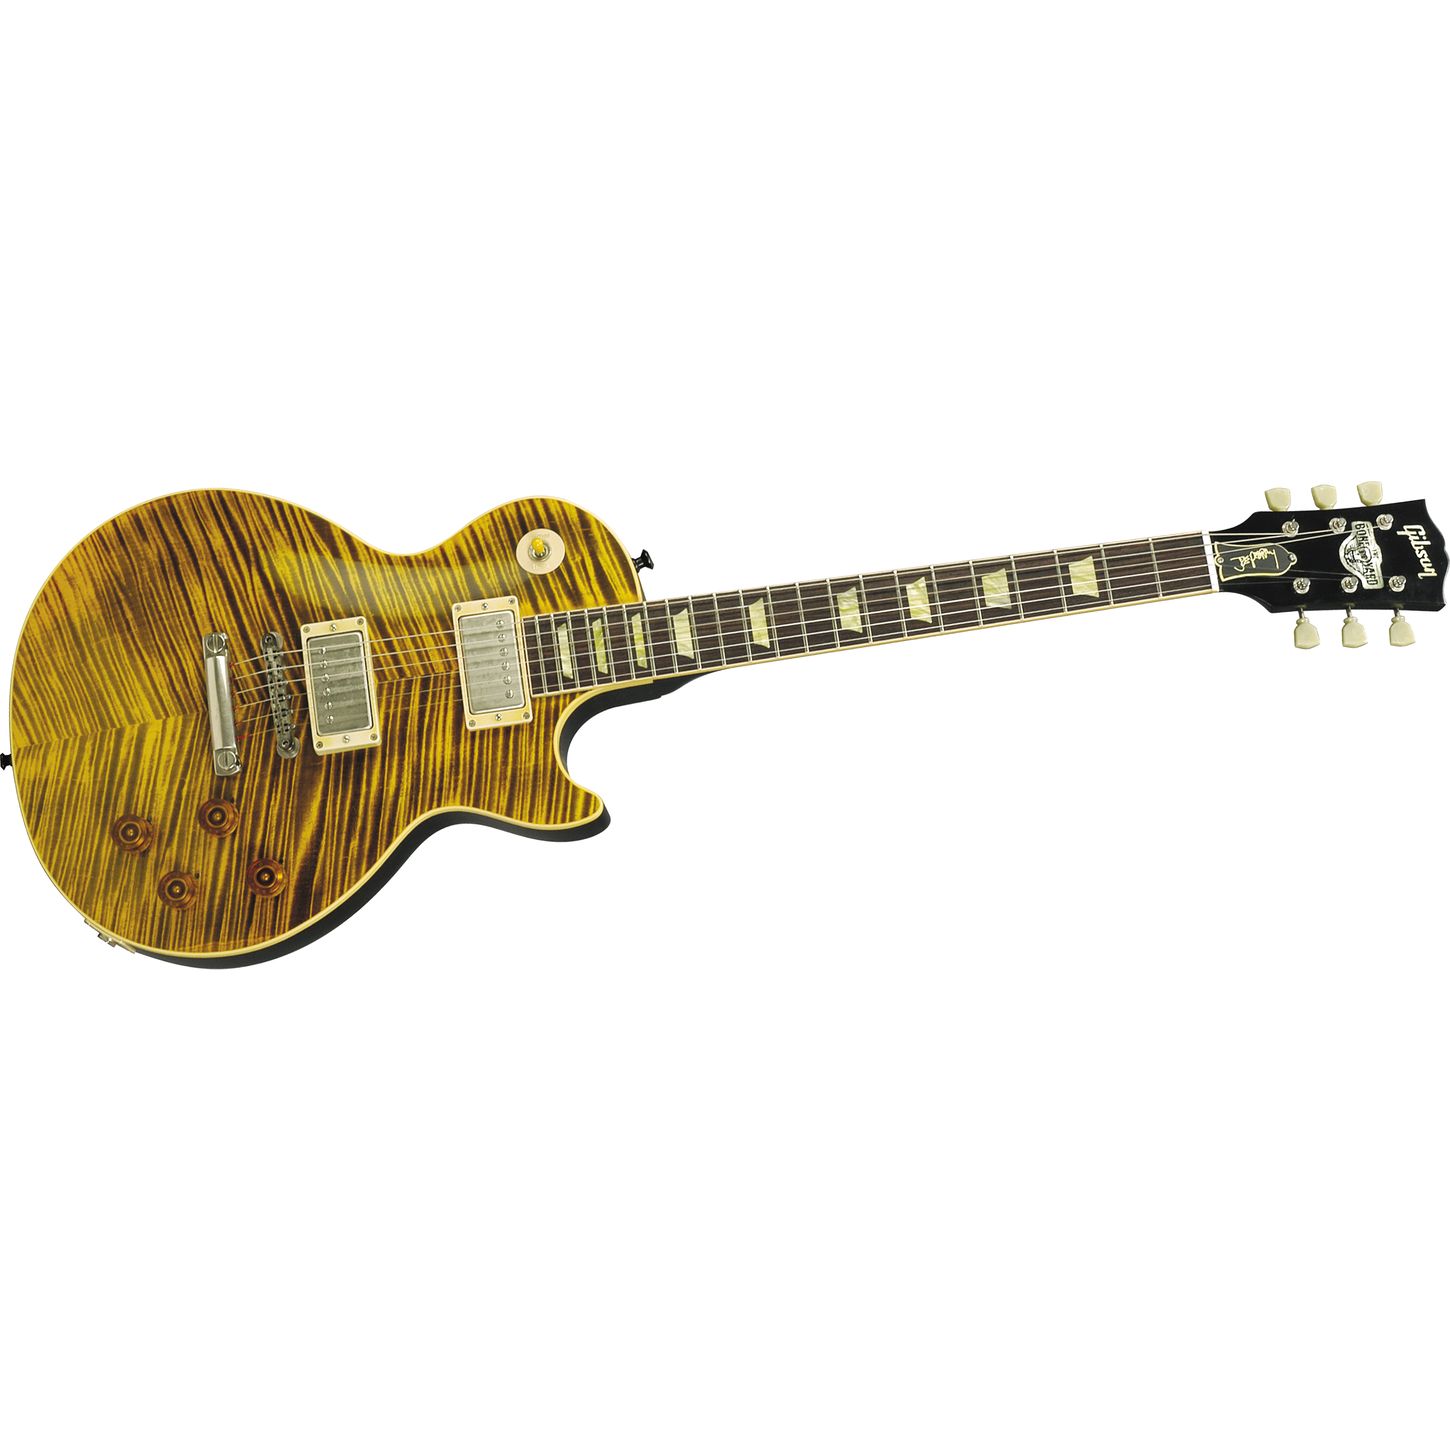
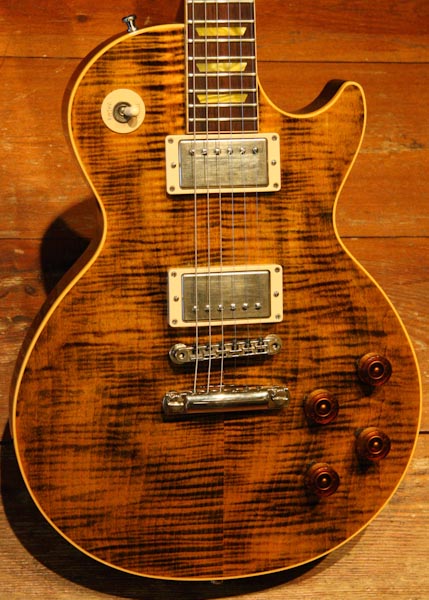
Since a couple of weeks I am the proud owner of a genuine Gibson Joe Perry Boneyard Les Paul. Intrigued by the guitar and its beauty, I decided to dive more into the backgrounds of this guitar, which is no longer produced by Gibson. It was produced from 2004 to 2006..
Joe Perry Boneyard Les Paul
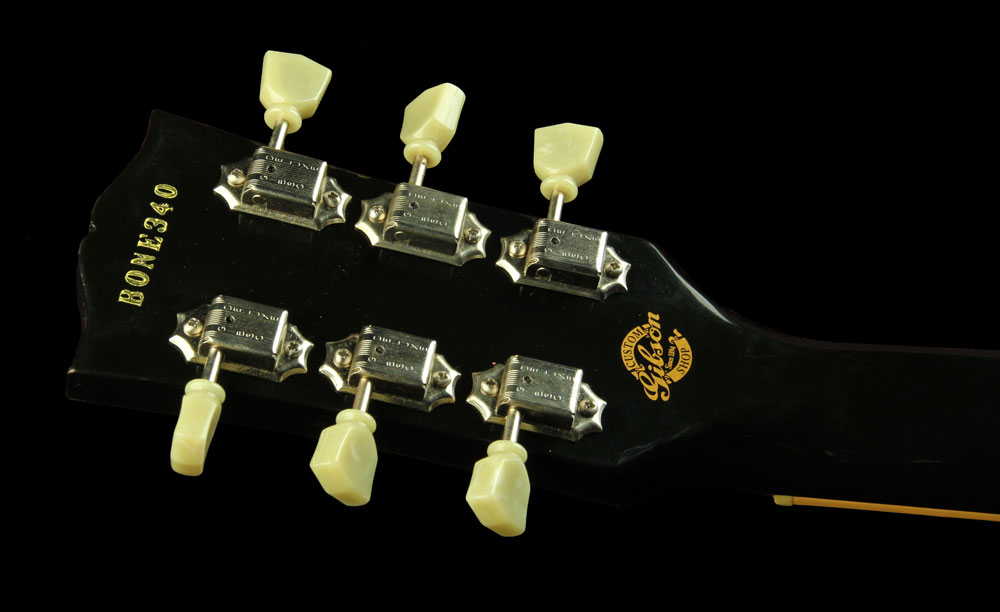
The guitar was built by Gibson’s custom shop. Only 502 guitars were built, including the 2 prototypes called Pilot Run models. These models have an inked number and hand written “Pilot Run”. I do not know how many prototypes were made, before this series of 502.
Prototype
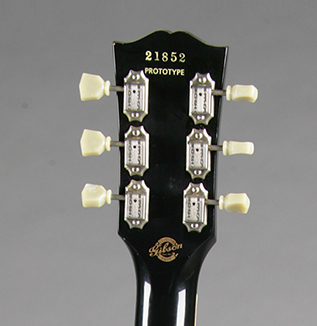
The production version (no difference in spec) numbered in sequence as “BONE xxx” The one below is from BONE340 (not mine). I have not yet found a BONE owners register but that would be cool. The lowest number I have seen was BONE002 and the highest was BONE 502.
Bone 340
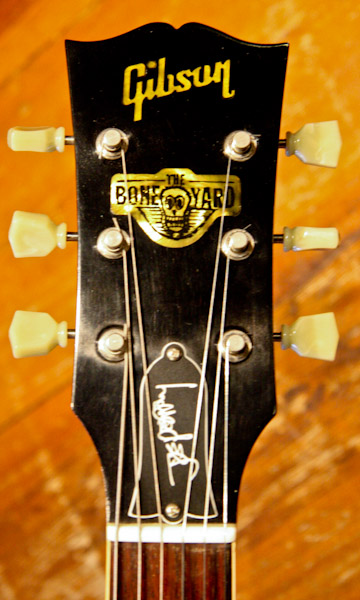
The guitar has a figured carved maple top, with a custom “Green Tiger” or “Aged Tiger Green” finish in nitrocellulose lacquer. Custom shop has selected great wood for this guitar. it has vintage cream binding, aged nickel hardware, and Kluson-style tulip-button tuners. The headstock has a mother-of-pearl “Boneyard” headstock inlay, as in the picture below, which is from my own guitar.
Boneyard headstock (my own guitar)
Notice the truss-rod cover which is engraved with Joe Perry’s signature. The BONE has the tune-o-matic (ABR-1) bridge and stopbar tailpiece. where also a Bigsby vibrato was optional. The guitar has been fitted with humbucking pickups—a BurstBucker 2 in the neck for warm, vocal tones, and a slightly hotter BurstBucker 3 in the bridge for muy midrange grind and singing lead tones. Notice something really cool, which is that the neck pickup has been wired reverse-polarity for funky out-of-phase tones in the middle position, per request of Joe Perry. Here’s a picture of my own BONE.
Boneyard pickups
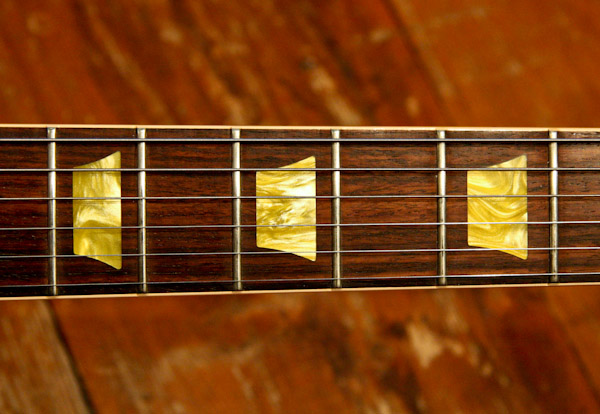
The guitar has a mahogany body and highly figured carved maple top being AAAA figured maple. The construction is a 1-piece mahogany with long neck tenon. It has a Rosewood fingerboard with aged acrylic, as shown on the picture below of my guitar. This s is similar to Les Paul Classic . The neck has 22 frets and has a rounded profile similar to 1958 Les Paul. The scale length/Nut width: 24-3/4″; 1-11/16″.
The controls on the body are 2 volume, 2 tone and a 3-way switch.
Bone acrylic trapezoid inlays
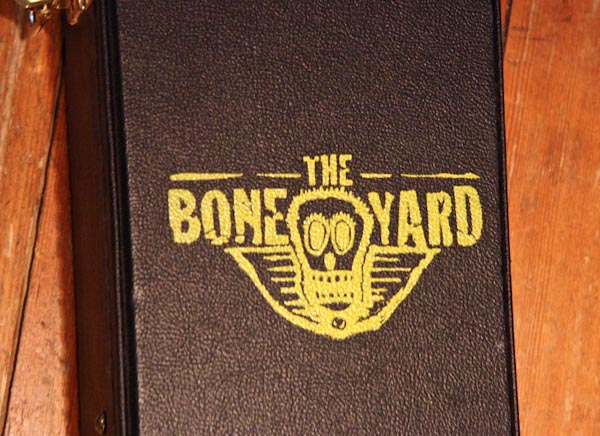
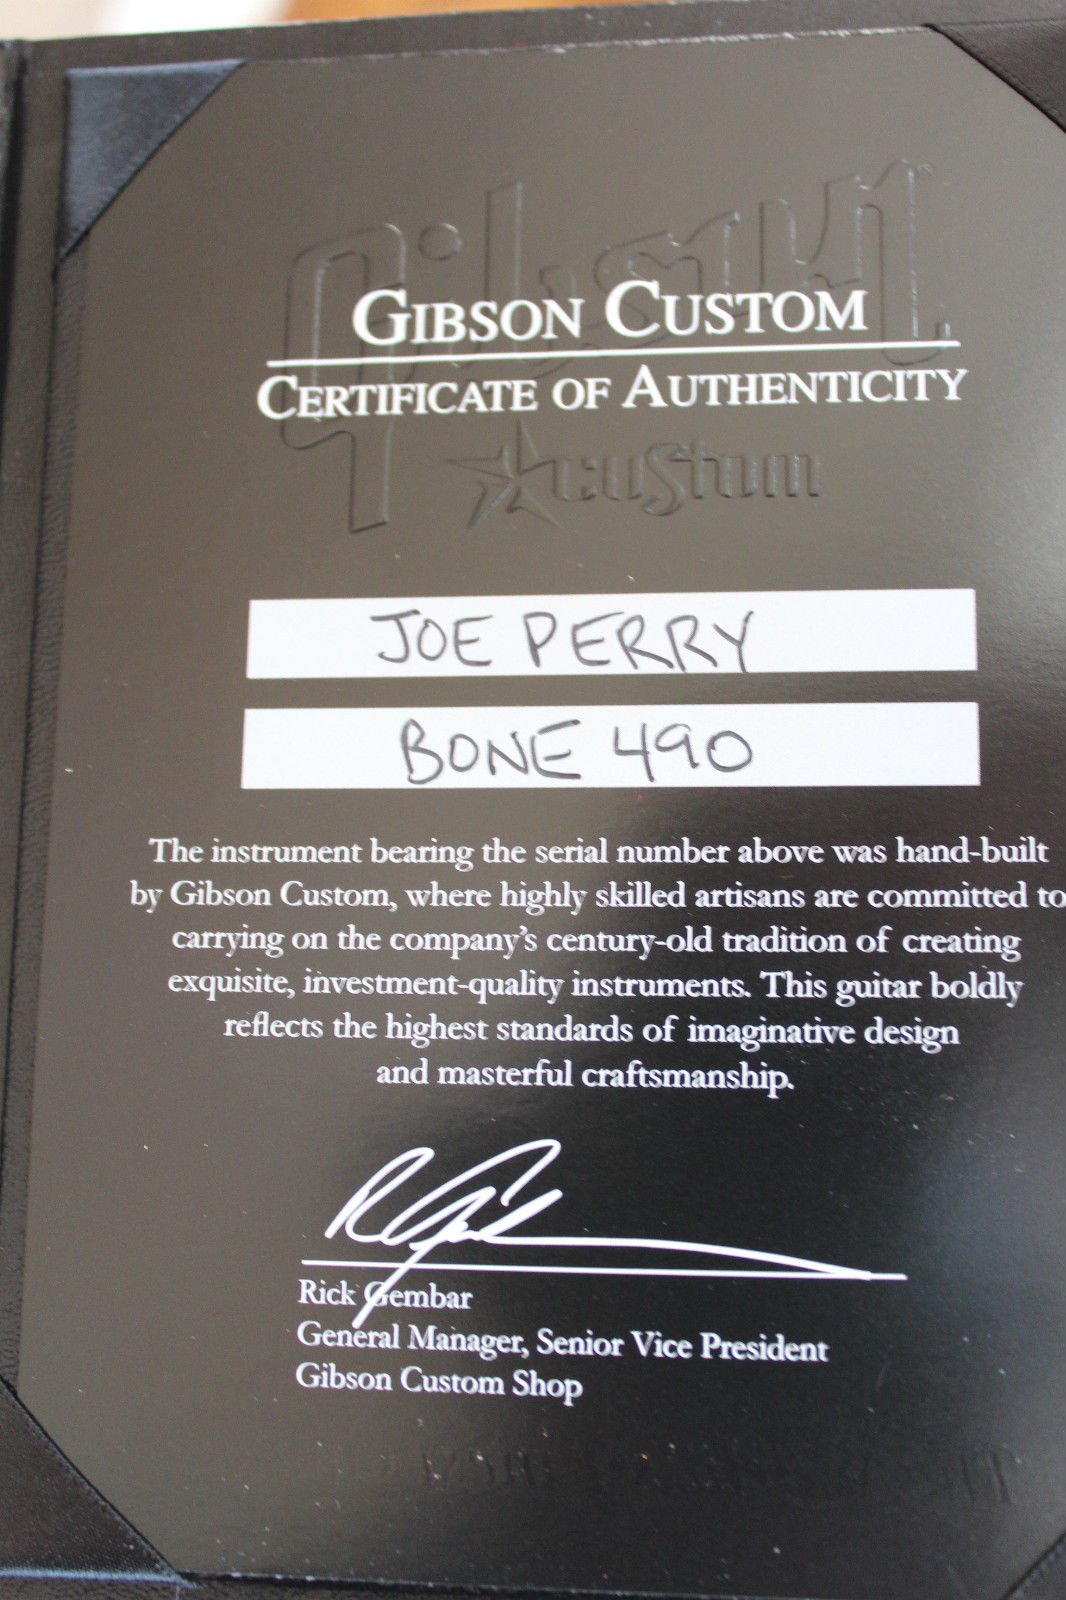
.Each guitar was shipped by Gibson each with a Custom Shop hardshell case and Certificate of Authenticity, making the package complete.
Boneyard hardcase
Note that there are a lot of fake BONES around. An expert will spot the difference (and can actually hear the difference), so if you every have questions about one of the BONE’s you would like to buy, feel free to contact me.
Certificate of BONE 490
So, the complete package: the guitar, the details, the hardcase and the certificate make the value of this guitar. Naturally, if you also have the pre-shipment checklist with it, it’s even cooler. Here’s another picture of my guitar.
Complete Boneyard package
The Gibson employees who worked on the project were given a special T-Shirt:
Okay, there you have it….. Which guitar strings does Richie Sambora use? Really? Yup… I just wondered if Richie would have any preference in strings, just like I do. Typically, I use the standard Fender .009 string set. Nothing fancy, just the Fender® Super 250’s Nickel-Plated Steel (NPS) strings .009.
Fender Super 250’s Nickel-Plated Steel Strings
Now, back to Richie. I recently learned that Richie has endorsed a guitar string line at D’addario Strings. There are three types of strings Richie endorsed. I have not yet figured out which gauges, though.
XP15 Coated Phosphor Bronze, Extra Light, 10-47 (details here) – Price: approximately €12,- per set
XP15 Coated Phosphor Bronze
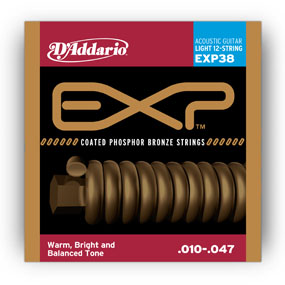
EXP38 Coated Phosphor Bronze, 12-String, Light, 10-47 (details here) – Price: approximately €21,- per set
EXP38 Coated Phosphor Bronze
EXL110 Nickel Wound, Regular Light, 10-46 (details here) – Price: approximately €5,- per set – Obviously the cheaper set.
EXL110 Nickel Wound, Regular Light, 10-46
I honestly admit that I have not yet tried these strings….. yet…. But I definitely will try the XP15 set and see what these do.
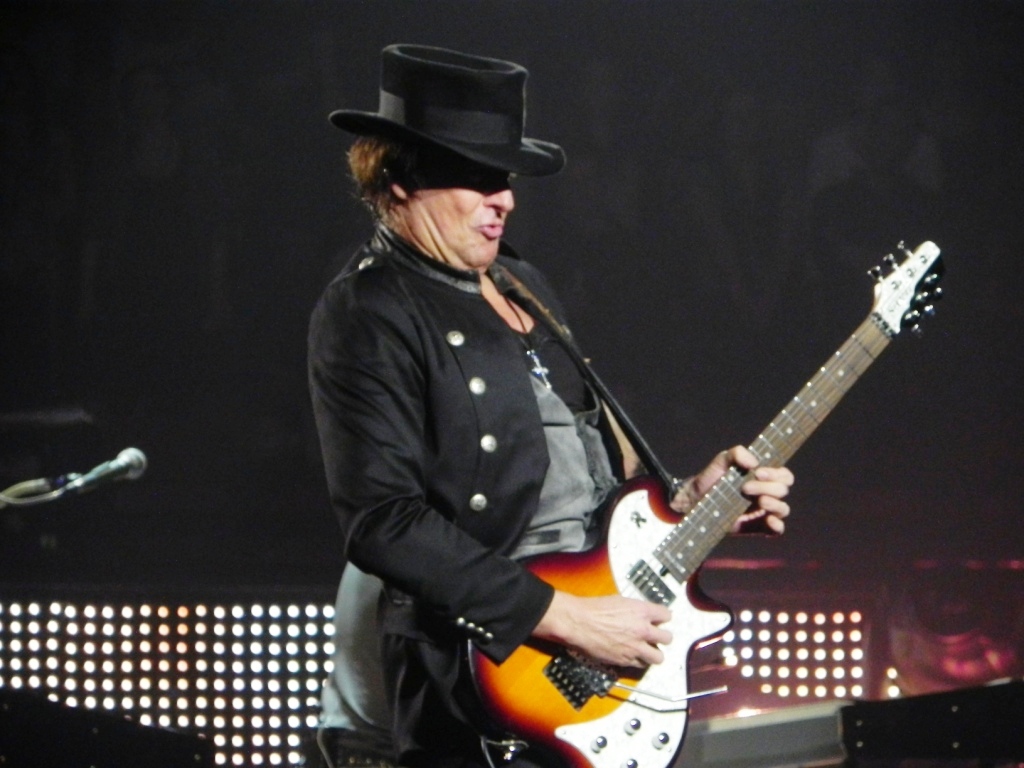
After a number of gigs and after seeing various pictures, I noticed that Richie has played on a sunburst SA-2, on various occasions. My guess on this guitar is that it was a modified production SA-2 from ESP/LTD. It did look very nice and I was impressed by the shape and the combination with the color.
SA-2 Sunburst (2)
SA-2 Sunburst
Now, getting an SA-2 is getter harder and hard, ever since these guitars have gone out of production. The SA-2 has been end of life for a couple of years now. (see my post on this topic). So, obtaining one would be possible, but harder every day.
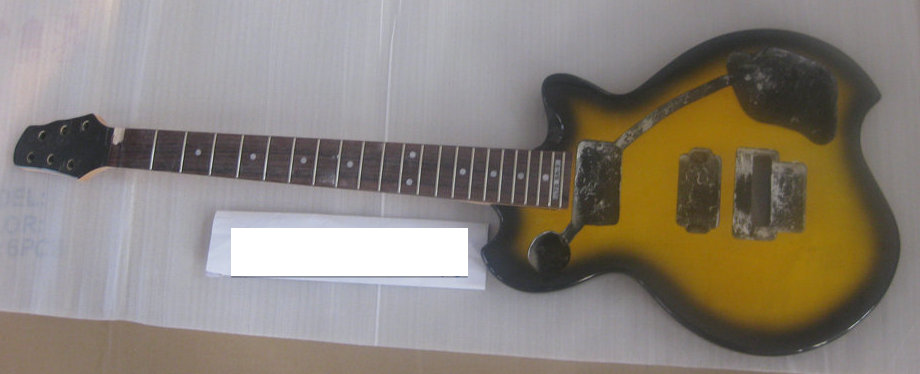
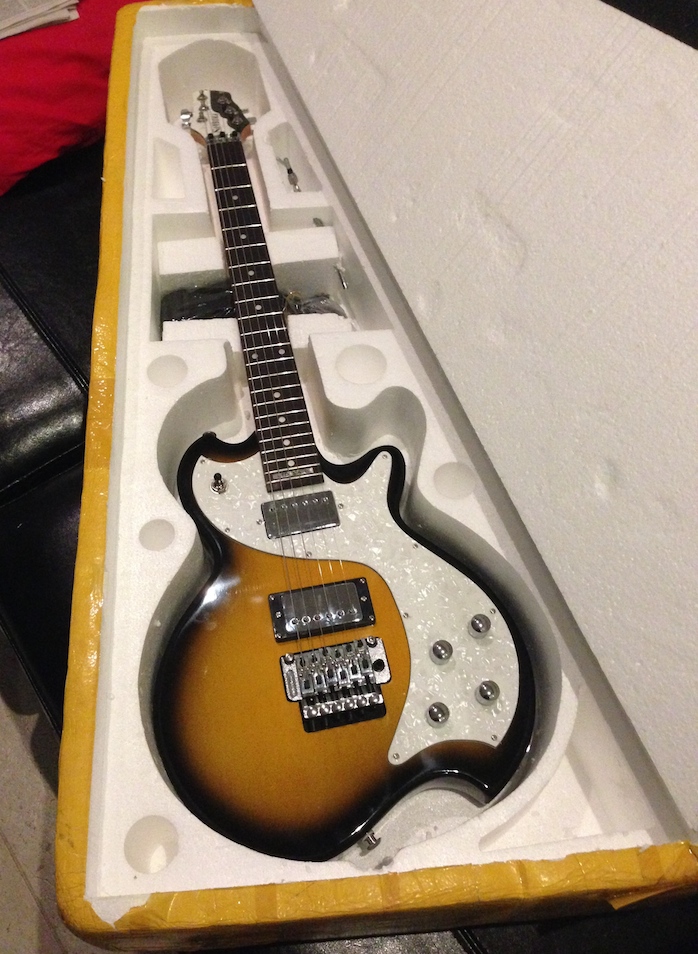
Therefore, towards the end of 2013 I contacted a custom guitar builder for me who would be able to make a replica of this guitar, in the sunburst colours, with the Richie Sambora specifications. It took several weeks before the builder was able to provide me with some pictures during the process of building.
The sunburst SA-2 in the making
The SA-2 sunburst body joined with the neck
A number of weeks later, the guitar was ready and was delivered carefully at my front door, very well packaged.
The SA-2 Sunburst delivered at home
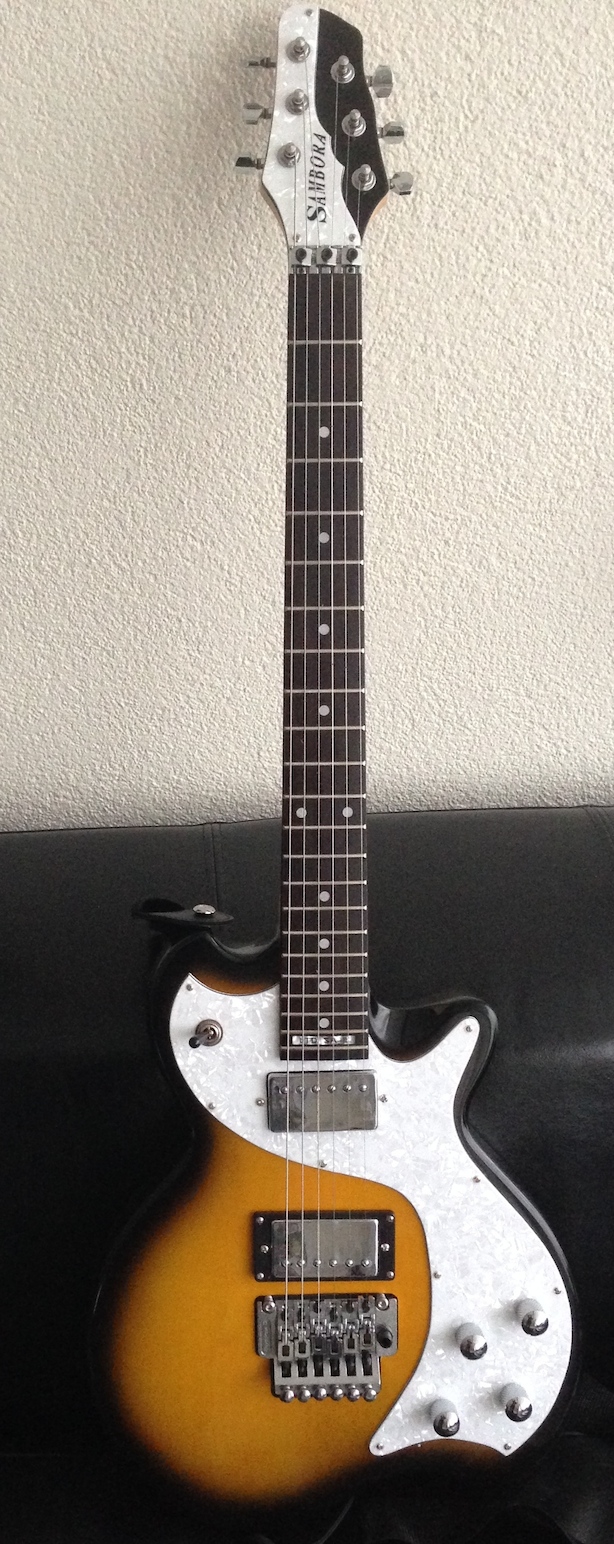
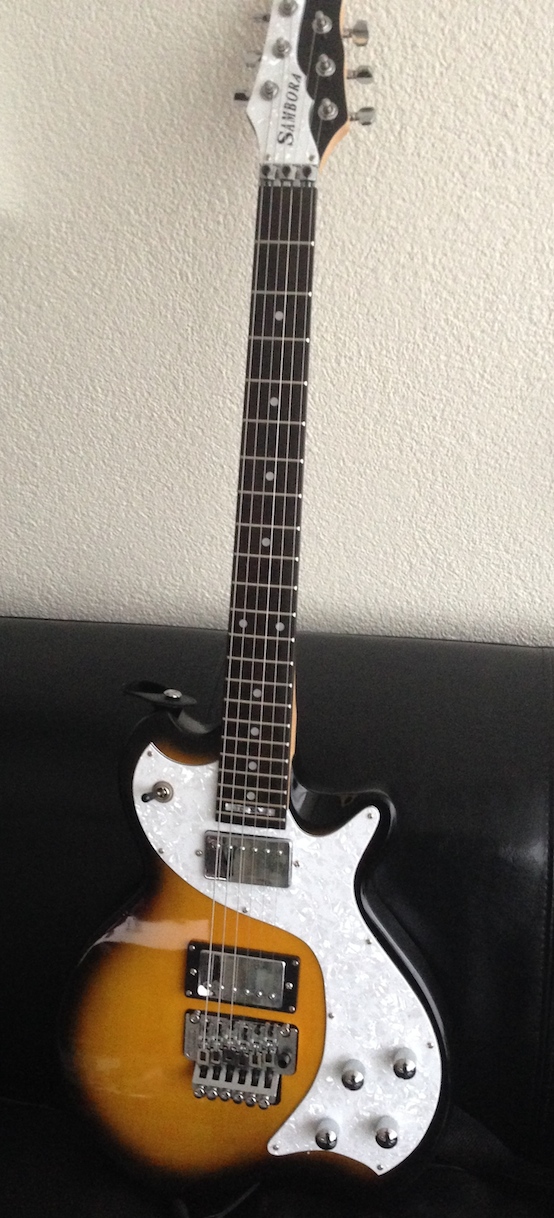
I must say that the end result is great. It plays very well and sounds great. Here are some more pictures for you. If you want to know more about my custom SA-2, please drop me a note using the feedback tab in the top right of this screen.
My custom SA-2 Sunburst
The body (from an angle)
My Sunburst SA-2 in full glory
The guitar has the following specifications, which do not differ so much from the production ESP/LTD guitar.
The body is made of Basswood and the neck, which is a bolt-on, is made of maple. Just like the original SA-2, the neck has not been painted. The fretboard is made of Rosewood and has a scale length of 25,5 inch across 22 frets. The guitar has been provided with 2 humbuckers, which will be replaced for other ones, in the near future. The hum buckers are switched and controlled using 2 volume knobs, , 2 tone knobs and the 3-way toggle switch. Naturally, the guitar has been fitted with a Floyd Rose Tremolo.