Richie Sambora Amplifiers

Many times I wondered which kind of gear Richies used with Bon Jovi. Though I have witten a post on this some time ago, I must admit that Richie does qualify as a “gear wh*re”. This guy… He uses many different kinds of amps, guitars and effect processors. My guess is, Richie has some serious G.A.S..

First of all, there are the amplifiers Richie uses or has used. Here are some impressions to give you some more inspiration. Here is the amp sets Richie used in 2010. The picture was taken in Melbourne, Australia

Richie's 2010 amps in Melbourne

Richie’s 2010 amps in Melbourne

We can see that Richie has used these amps in 2008 already. The picture below was taken back stage at Bristol’s Ashton Gate stadium, UK. Yes, the custom Martin Double Neck in the picture is nice, but that’s not what we are focussing on.

Richie's Amp in the UK 2008

Richie’s Amp in the UK 2008

Now, I also know Richie has endorsed the Blackstar amps. I must say from experience, these are nifty little amps and are great sounding. I have seen Richie play some Blackstar amps here and there, but not on a large scale.

Richie endorses Blackstar

Richie endorses Blackstar

Back in 2006 Richie also played on Diezel amps:

Richie's Diezel Amps 2006

Richie’s Diezel Amps 2006

Richie's Diezel Amps 2006 (2)

Richie’s Diezel Amps 2006 (2)

Here’s a blast from the past where Richie endorses KMD amps. Call me crazy but in Europe I have never seen one, let alone played on one.

Richie endorses KMD

Richie endorses KMD

My guess is that this is Richie’s Ultimate rack (it would be my Ultimate Rack at least.)

Ultimate Rack

Ultimate Rack

I will be adding more to this page alone the way. Feel free to drop me a line (contact form is on the right top hand)


Categories: Guitar Gear, Richie News | Tags: , , , , , , , , , , , , , , , , , | Comments Off on Richie Sambora Amplifiers

Richie Sambora SA-2 variations

I decided to dig a bit deeper into the various versions there are or were of the ESP / LTD SA-2 Richie Sambora Signature Guitar.

Due to the fact that Richie is now a self-employed musician and is no longer (of still not) a part of Bon Jovi, the prices of the Richie Sambora signature guitars (Fender, Martin, ESP, Kramer) have gone up significantly. Why? Well, perhaps some fans fear there will be no signature guitar in the future.

Anyway, I decided to dig up some pics of the SA-1 and SA-2 including the prototypes.


SA-1

The SA-1 is the first prototype used by Richie and has only one pickup, at the bridge position. It was built by Chris Hoffschneider and was designed by Richie. The SA-2 often had the Floyd Rose Speedloaded on the headstock and the bridge.

The  SA-1 is thus the non-production version of the SA-2. The SA-1 has the Speedloader on the head and does not have the “Sambora” logo on the head. SA-1 was at least made in 2 versions. White and Black, which had 2 pickups and the all-white, which has only one pickup.

They can also be identified by the fact that it has the speedloader made by Floyd Rose on the headstock. Richie Played this particular white version of the guitar at the bon Jovi gig in Milton Keynes (UK) on June 10-2006. The guitar is now for sale on E-Bay for USD 10.000 here.

SA-1 (1)

SA-1 (1)

SA-1 (2)

SA-1 (2)

SA-1 Upclose1

SA-1 Upclose1

SA-1 Upclose2

SA-1 Upclose2

The other SA-1, the black version, was probably one of the earliest version Richie played. This one has the double pickup config. I guess one pickup did not do the trick. It has the speedloader on the headstock. More information can be found on my page here.

SA-2

The SA-2 (with the 2 pickup configuration) comes either with or without the speed loader. ESP only manufactured these without.  This version was spotted  in 4 colours while used by Richie: Black/White, White, Sunburst or Black/Silver.

First, here is the production SA-2, by LTD. More info here.

LTD SA-2

LTD SA-2

Then there is a, what seems to be a modified production SA-2 (notice that the headstock does not have the speedloader, but more the traditional head with the knobs). Richie also used regular production versions of the SA-2 on stage. here it is.

Richie with SA-1

Richie with SA-2

See the 2 pickups here below.

Black and white SA-2

Black and white SA-2

Then there is another variation of the SA-2 which is the black and gray version. This one is less known to the public. The pickguard is silver in stead of white.

SA-2 Black and Gray

SA-2 Black and Silver

SA-2 Black and Silver (2)

SA-2 Black and Silver (2)

Here is the sunburst version of the SA-2

SA-2 Sunburst (2)

SA-2 Sunburst (2)

SA-2 Sunburst (2)

SA-2 Sunburst (2)

Sunburst SA-2

Sunburst SA-2

And here is the white version of the SA-2. Mind the white/white headstock in stead of the black/white headstock.

SA-2 White

SA-2 White

SA-2 White 2

SA-2 White 2

SA-2 White 3

SA-2 White 3

Again, this one does not have the speedloader, so it seems to be a modified production version of the SA-2. As soon as I identify more of these guitars, I will post them.

And for those pictures I posted…hope you do not object to the posting. I use the to inform the fans all over the world and I do not have any commercial objective.

Categories: Guitar Gear, Richie News | Tags: , , , , , , , , , , , , , , , | Comments Off on Richie Sambora SA-2 variations

Black Paisley Stratocaster® HSS

This evening I was telling one of the band members that I was not in the market for buying a new guitar. I did not have any g.a.s.. I would not spend any money on new guitars or amps etc.

Well, so much for that. I was browsing the web a little bit and stumbled into a new Fender Guitar: the all new Black Paisley Stratocaster® HSS. Yes. a Black Paisley. As you all know by reading my blog, I am a great fan of this type of guitar. See this post.

Now, I fully realize that this guitar, which costs approximately 575,- Euro, is of lesser quality that my Japan built Black Paisley Richie Sambora Signature. But…. “musssssttt buyyyy guitarrrrr”… It is too nice and too good not to buy it.

So, I did order this guitar tonight… Yes.

Here are the specs:

Model :   0140073506       Series :   Factory Special Run

Model Name: Black Paisley Stratocaster® HSS
Series: Factory Special Run
Color / Part #:
  • Black Paisley
    014-0073-506


Body: Alder
Body Shape: Stratocaster®
Body Finish:
  • 0140073506
    Polyester


Neck Shape: Modern “C” Shape
Number of Frets: 21
Fret Size: Medium Jumbo
Fretboard Radius: 9.5″ (24.1 cm)
Fretboard: Rosewood
Neck Material: Maple
Neck Finish: Urethane
Nut Width: 1.650″ (42 mm)
Scale Length: 25.5″ (64.8 cm)


Pickup Configuration: H/S/S
Bridge Pickup: Standard Humbucking Pickup
Middle Pickup: Standard Single-Coil Strat® Middle Pickup
Neck Pickup: Standard Single-Coil Strat® Neck Pickup
Pickup Switching: 5-Position Blade, Position 1. Bridge Pickup, Position 2. Front Coil of Bridge Pickup and Middle Pickup, Position 3. Middle Pickup, Position 4. Middle/Neck Pickups, Position 5. Neck Pickup


Hardware: Chrome
Bridge: Vintage-Style Synchronized Tremolo
String Nut: Synthetic Bone
Tuning Machines: Fender® Standard Cast/Sealed


Strings: Fender® USA, NPS, (.009-.042 Gauges)

 Here is a short movie, with a modified bridge pickup, though.


Categories: Guitar Gear | Tags: , , , , , , , , , , , , , , , , | Comments Off on Black Paisley Stratocaster® HSS

No Time To Loose @ Wootrock 2012

Early this year I performed some live recordings at Wootrock 2012, for Deafening. Here is one song which was posted on youtube. I must say the non-Youtube Master is of better quality, but own well…

Have fun


Categories: Lost Highway Studio | Tags: , , , , , , , | Comments Off on No Time To Loose @ Wootrock 2012

New KRK VXT6 have arrived

Finally, after placing the order last week, I was able to pick up the KRK VXT6 today. It’s a set of 2 speakers and I have installed them today in Lost Highway Studio.

Naturally, since I work with the KRK ERGO, I had to re-calibrate the control room.

So, after updating the firmware of the ERGO (which still has to be done on a 32 bit machine), I have completed 20 room measurements.

The result of the setup: It’s amazing. I have been listening to some old mixes, and I instantly heard that the mixes were ok, but can be adjusted easily, with this setup. I was amazed.

So, all in all, the set of two KRK VXT6 speakers was a very good choice!


Categories: Lost Highway Studio | Tags: , , , , , , , , | Comments Off on New KRK VXT6 have arrived

New Speakers – KRK VXT6

After a some years of faithful service, I decided to sell the Tascam VL-X5 speakers. The speakers were ok, but after a number of years I wanted to upgrade the studio. I am convinced that having better speakers gives better performance.

Now, Since I do not have the budget for Dynaudio, I decided to go for the KRK VXT6. Naturally, I realize I could have gone for the smaller VXT4 or the ToKit 6 G2. Well, I think the Rokit series, especially, the G2 series, is very good. However, the VXT series is more for studio work, more neutral work, where the RoKit is more for dance and house productions, I am convinced.

Anyway, this will be the new set, to be delivered soon. I will keep you updated on the performance.


Here is a great review from Sound On Sound.

Categories: Lost Highway Studio | Tags: , , , , , , , , , , , , , , , , | Comments Off on New Speakers – KRK VXT6

Book – Internal Mixing

I recently purchased the book called “Internal Mixing” written by Friedemann Tischmeyer, subtitled ” How to create a professional mix on your computer – a systematic approach”.

The book is written veryy understandable and has a lot of examples.

Internal Mixing Book CoverThe book is on sale at Amazon 

The reviews are very great. and the book is meant for learning to mix using a DAW, both for beginning and experienced readers. This book provides incredible insights into how to make the most of your system to achieve better sounding, more professional mixes.
The author does a great job of bringing all of the concepts together in any easy-to-understand format and walks you through enhancing several actual mixes using simple, proven techniques. The coverage of the compressors is very detailed and well-illustrated (one of the best I’ve found), and the author does a great job of making the more difficult reverb and delay concepts easy to understand. Even more general concepts are covered, such as how to best organize a large mix and how to create your mixes in less time. A selection of the most common plugins of the various types are also detiled along with the sound qualities they provide.
The author’s primary DAW is Cubase/Nuendo, so those users will get even more out of the book because they can directly apply the techniques and templates to their projects. That said, this is not a tutorial on DAWs. The author spends most of his time on understanding the principles and techniques, as opposed to how to use Cubase or Nuendo.
The Book is well written. Excellent coverage of plugin techniques, enhancing the mix, and workflow. A variety of plugins are detailed (as opposed to some books which only show how to work with a specific vendor’s offerings). Examples are practical and usable in most environments.

However, in order to get the most out of the book, you really need the two DVDs (Internal Mixing Tutorial DVD Vol.1 and Internal Mixing Tutorial DVD Vol.2) in this series. It’s not required to understand the material, but the chapters really are designed to compliment the DVDs rather than replace them. The DVDs can also be ordered as a set: Internal Mixing Tutorial DVD Vol.1&2 Bundle.


Categories: Lost Highway Studio, Tech | Tags: , , , , , , , , , , , , , , , , , , , , , , , , , , , , , | Comments Off on Book – Internal Mixing

Wootrock 2011

It’s that time of year again where Wootrock is due in Heemskerk. Since a number of years Wootrock is the local rock and metal festival in Heemskerk, the Netherlands. Wootrock will be organized on November 19, 2011 at De Nozem en de Non in Heemskerk.

Wootrock is organized by Deafening’s vocalist Wouter Peters (Woot). A number of excellent Dutch Rock and Metal bands are performing again.

I will be taking care of the sound for Deafening, and will also be recoding the performance of Deafening in Cubase, along with the Motu I/O 24. I will be adding a number of the live tracks on this website.

Be There!

Categories: Lost Highway Studio | Tags: , , , , , , | Comments Off on Wootrock 2011

Studio Creativity – vocal to midi

Since I am currently working on some studio recordings, I decided to share some stuff with you guys. As a reader of my blog you must sincerely appreciate things I have to share with regard to studio work.
Anyways. I am currently working on the new album of Deafening. After finishing the last album called Disillusion, which I have produced along with the guys, it was time for some fresh numbers to be recorded.

Disillusion CD Hoes


So, recently, Axel, Case, Flow, Wouter and myself started recording new material at Lost Highway Studio. After laying down the basis of the tracks, the second guitar parts were recorded, in order to give the sound more body. Being able to tweak Flow’s sound in such a way that in blends into the mix, the songs are getting better and better.

Along with Wouter, we have recorded a multitude of vocal tracks, and for some songs even, we were able to create a real choir. Now, the results are to be heard in a later stage.

Some ne tricks I have learned in Cubase were that by using the right tools, you can create a midi track from a vocal track, in otder to support virtual instruments. How is this done? Here’s a quick guide:

  1. record the vocal track. Be sure that the track is as well recorded as possible.
  2. Double click on the vocal track and go to VariAudio
  3. Anayze the vocal track and correct the pitches and the warps as well as as extensively as you wish.
  4. Click on functions.. under the VariAudio menu and select Extract Midi
  5. After having done this, you will be able to see a new midi track.

Now, all you need to do is connect a VST to this track. For use of a choir for example you could use a VST such as Magnus Choir, which is an easy to use tool. Although I wish the interface was somewhat larger.

Magnus Choir

How you have found this to be a useful post.


Categories: Lost Highway Studio | Tags: , , , , , , , , , , , , , , , | Comments Off on Studio Creativity – vocal to midi

SA-2:Wax-potting pickups

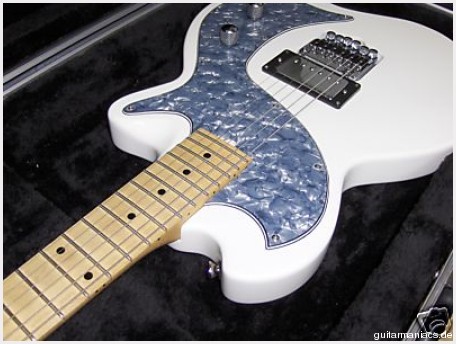
As you were able to read, I have purchased another LTD-SA-2 guitar. Knowing thie guitar very well, I also know the flaws of the guitar. It plays really well, with the unfinished neck, the great Floyd Rose tremolo with top-locks… However, after my first purchase, I noticed something really weird. The pick-ups are microphonic.

What does this mean? Basically, the pick-ups generate a load of feedback to the amplifier, more that normal. Now, I do realize that every guitar generates some feedback, more or less. However, the SA-2, in bridge position, unleashed hell when I switched to distorition…. again. See this post.

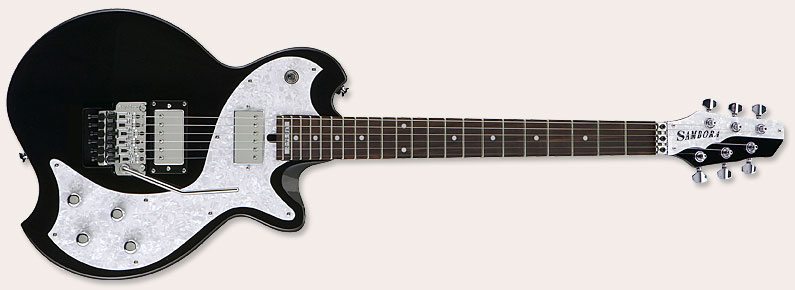
The SA-2 is equipped with two ESP LH-100 pick-ups.

The removed LH-100

This picture I took after removing the pickups in the first SA-2 . Basically, the LH-100 pick-ups are consideren to be ok and provide a more vintage sound. In principle, the bridge pick-up sounded ok… ALthough I was not a hundered procent impressed. But hey… first things first… The pickup is microphonic, so much that if you would talk to the pick-up up close, you would be able to hear yourself through the guitar amp. Eat that.

Now, a friend of mine, also a great bass player, mentioned to me that wax-potting would be a possible solution for this issue. Bear in mind though that high quality winds are less microphonic without wax than pickups of lesser quality are with wax or epoxy. So all in all, I am not too impressed with the LH-100’s.

In principle, this is what wax-potting is all about:

“The term “potting” refers to the sealing of the coils in a solid material. Potting stabilizes the components of the pickup so that they cannot move relative to each other. This elminates vibration-induced signals that make a pickup microphonic. Potting can also protect the inner coil from corrosion.  The technique described here is not just potting, but also “coil immersion.”   Coil immersion is allowing a solid (wax) to be absorbed into the coil.  Wax is used
because it works well, is inexpensive, and it makes it possible to work on the pickup later.  A correctly potted pickup coil will have the wax absorbed throughout the coil as well as the surrounding parts such as magnets,
polepieces, and metal covers.  This eliminates movement of parts inside the pickup.” –
Potting Pickups to reduce microphonic noise – by John Thornburg and John Atchley.

This means, I had to remove both humbuckers from the body…. again. I have been through this process a number of times, so here I go again.

I used the following:

  • one small philips screw driver
  • one 25 Watt soldering iron

So, after removing the humbuckers, I marked them.. or better, the one with the blue wire was the bridge pickup, the one with the red wire was the neck pickup. If this would not be the case, it would have been a good idea to mark the pickups with a marker, before continuing. Now I had one challenge, which was taking of the cover. I have seen articles on the web where the cover was removed before wax potting the pickups. The challenge was that the cover was soldered to the plate. Now, keep in mind that the cover absorbes a lot of hear, so I was unable to de-solder the cover with my 25 Watt iron. Later I tried a 150 watt version. But I realized that this might damage the inside of the pickups, I seized this operation.

Also when you read John’s article correctly, you read that it is not necassary to actually remove this cover.

Now, the following YouTube movie shows a good way to approach wax potting:


The outcome of the wax-potting was interesting. After I reinstated the pickups into the SA-2, I hooked the guitar up to my Sessionett and my Roland GP-16. I switched the effect to distortion, like I did before. The feedback was gone and I could not “talk through the pick-up”  anymore. So, that was a good sign.

I did notice however, that the sound became a bit less clear and crispy, and emphasizes more on the lower notes, e.g. more vintage. I set the pickups a bit higher to get more output.

All in all, this is a pretty good deal in stead of buying new pickups. Now, I still need to test the guitar on my Marshall stack. I will update you on this once I have more info.

Categories: Guitar Gear | Tags: , , , , , , , , , , , , , , , , , , | Comments Off on SA-2:Wax-potting pickups

LTD SA-2 end of life

After visiting the website of ESP guitars the other week I noticed that the LTD SA-2 Richie Sambora signature guitar was not available anymore on the website. After purchasing one at the end of 2008 I noticed that the guitar was not available in 2011 anymore, only in 2010.

After checking the stock at Thomann and Musik Produktiv I also noticed that the guitar was not available anymore. Since I have always wanted to purchase a second model, due to the fact that the guitar plays really well, especially with the unfinished neck, I decided to go for it.

Now, I have put out an add on the larges dutch auction website called Marktplaats but after a week I did not find a used model. And used…. hmmm, perhaps a new one would be appreciated. So, I emailed by favorite music store in the area called Timmer Muziek in Beverwijk, The Netherlands, who has a very large stock of guitars, mostly new.

The owner of the store told me that he had one in stock and could sell it to me for a nice price. Since I am a regular customer there, that is a nice thing. I always like shopping there.

This morning, I have thus purchased my second SA-2. I will probably be replacing the pick-ups with Gibson Burstbucker pickups this time. The point is that the pickups on the SA-2 are not great quality. The bridge pickup by itself sounds o-k and could probably do, but the neck pickup, also in conbination with the bridge pickup (where the switch is in the center position) simply squeeks and gives a load of feedback, when my disortion is activated. I cannot seem to figure this out. I also encounterd this on the first SA-2, so I figure this was not a one time incident. The previous SA-2 I have equipped with DiMarzio PAF Pro, which gives a very nice and clear sound. However, this time I would like to get more output and would like to give it a thicker sound.

Chris Hoffschneider, the designer of the first prototype for Richie, used pickups designed by J.T. Riboloff. I need to get in touch with J.T. 🙂

Here is a picture of the 2 SA-2’s together at Lost Highway Studio. Sorry for the poor quality, but the camera on the Blackberry is not to well.

Two LTD SA 2's

Two LTD SA 2's

Categories: Guitar Gear | Tags: , , , , , , , , , , , , , | Comments Off on LTD SA-2 end of life

Heart of the studio

Every studio has its “heart”, which is typically the mixer, or, in some cases, the computer.

Since Lost Highway Studio is considered to be a hybrid studio, I make use of a number of components to record.

  1. The MOTO 24 i/0 interface
  2. The Windows 7 PC
  3. The Solid State Logic Duende
  4. The KRK ERGO
  5. The 2 TASCAM Near Field Monitors
  6. Cubase 5.5
  7. The Behringer MX9000


The latter one is the heart of my studio. I could probably do without the mixer, but I decided it is a good recording and mixing tool  and creates the best flexibility for the above mentioned combination of hardware and software.

Behringer MX9000


The mixer has a number of features which can be found in the manual here and has a mother load of features such as:

  • 24 additional Mix-B input channels, all with individual 2-band EQ, Level, Pan and Mute
  • Dedicated 4-band EQ with 2 semi-parametric Mid bands offering an extremely wide-swept range from 50 Hz to 20 kHz
  • Up to 6 Aux send busses, all switchable pre/post fader
  • 6 stereo Aux returns with multiple routing options
  • 8 subgroups simultaneously feed 16 multitrack outputs
  • Built-in meterbridge with meters for each channel, subgroup and Main mix, monitoring either the channel or Tape return signal
  • +15 dB gain available on all Aux sends and returns
  • Highest-quality, discrete-balanced Mic preamps with -20 dB pad, Low-cut and 48 V phantom power
  • Balanced Tape inputs/outputs, switchable for -10 dBV or +4 dBu operation
  • Channel, Group and Main mix insert points
  • 100 mm high-precision logarithmic, tapered faders with big console performance
  • Separate solo-in-place and PFL busses available
  • 2-track tape monitoring with multiple routing options
  • 2 separate headphone mixes and Talkback facility with built-in microphone
  • State-of-the-art op-amps for crystal clear audio performance
  • BNC connectors for 12 V gooseneck lights
  • Expander port providing universal 1/4” link facilities to any other console
  • 400-Watt, external 19” power supply with superior transient response
  • High-quality components and exceptionally rugged construction ensure long life

Rear of the MX9000


My MX9000

So, I hope you can see why I call this the heart of my studio.

Categories: Lost Highway Studio | Tags: , , , , , , , , , , , , , , , | Comments Off on Heart of the studio

Building Lost Highway Studio

Around 2 years ago I moved to a new house., which is equipped with a significant basement, located under my garage. This basement has been retrofitted by the previous owner.

The space is devided into two areas, one being the large room, which is the live room and a smaller one, which is curently the control room. This space used to be a wine celler and has been fitted with floor tiles. Since this room has direct contact with the colder side of the house, I decided I needed to insulate this part of the basement, to prevent condensation of warm inside air against the cold outside wall. It was not intended as a vapour barrier.

In this image you can see the tile floor and some moisture, residing from the condensed air. I decided to use 20 mm floor mate tiles from Dow. These are blue tiles which have a high insulation value. These blue tiles are mounted against the wall and on the floor.

The ones on the wall have been sealed with chaulk and the ones on the floor with heat-insulating tape. The floor has been coverd by plywood board.

I actually left the tiles in. It was senseless and useless to remove these. If I would have done this, I would also have damaged the basement floor. So, the tiles are still under the insulation.

The walls were also covered with floor-mate tiles. I did need to work around the airconditioning unit. This unit is for cooling the control room.

Also all the other walls needed to be insulated. Here are some pictures which illustrates the process. After completing the insulation I did not have any further issues with condensation of the air. More pictures are to be posted soon.

This picture above is taken facing the door between the control room and the live room.

Click on a picture to see a bigger one.

In this picture you can also see the underside of the stair case. I have also insulated the stair case with fiber glass wool covered with 3 mm plywood and, finally, deflection material, which I have also put on parts of the walls. After the insulation, I decided to glue wooden sides on the walls, so I would have a decorative split on the wall. That is shown by the picture below.

Side decoration

Side decoration

Now, After the control room was insulated, I had to take care of the opeing at the stairs. The stair well was fully open and there was no door in front of this. Therefore, the door frame had to be mounted first. This is displayed by the picture below.

Door frame

Door frame

The door which needed to be mounted, needed to be very thick. The more mass you use, the better the insulation for sound and noise. Therefore, I custom built a door which is made out of multiplex and is 40 mm thick. Since the shape of the door frame is very weird, I had to make some nice corners in the door.

Custom door

Custom door

Categories: Lost Highway Studio | Tags: , , , , , , , , , , , , | Comments Off on Building Lost Highway Studio

Inside Lost Highway Studio

Some months ago Roel and me have been adding bass guitar tracks to some of the newly recorded Blackthorn songs. We have laid down the bass tracks for The Bleeding Heart and Treshold and more.

This little video gives you a quick glance of the inside of Lost Highway Studio.

Categories: Guitar Gear | Tags: , , , | Comments Off on Inside Lost Highway Studio

SSL Duende DSP

My Lost Highway Studio is equipped with a Solid State Logic Duende Mini. The Duende is basically a Digital Signal Processor which runs the SSL Duende Plug ins. REcently, these have also been released by SSL as the so called SSL Duende Native plug ins. However, since I would like to offload the stress of plugins from my DAW, I run the Duende Mini.

The Duende mini is a compact desktop box and can run up to 128 DSP channels and the mini is also expandable to two boxes attached to one DAW, meaning you can empower your computer to 256 DSP channels.

SSL Duende Mini

SSL Duende Mini

The box can run a multitude of SSL plug ins:

  • EQ & Dynamics Channel
  • Bus Compressor
  • X-Verb
  • X-EQ
  • X-Comp
  • Drumstrip
  • Vocalstrip


Naturally, I have upgraded my SSL Duende to the full spectrum. And I can tell you this… These are one of the best plug ins I have ever used and heard.

Categories: Lost Highway Studio | Tags: , , , , , | Comments Off on SSL Duende DSP